Showing posts with label series. Show all posts

Thursday, May 15, 2014

Meet My Machine

Today I'm over at Sewistry sharing my thoughts on the machine I own, Emerald 118 Husqvarna/Viking. 

Go check it out!
Displaying SMM button.jpg

Thursday, December 12, 2013

It's 'Flip' Time Again

 
 This time I flipped a pants pattern into a skirt and Sophia was the lucky recipient. If you want to read more, go check it out at Frances Suzanne!

Tuesday, December 3, 2013

Secret Squirrel

So Secret Squirrel has been trotting the globe giving out 5 acorns a month. It's a fun sewing challenge and you can read more about it here. The 5 acorns are just 5 things that you are supposed to tie in with the outfit you create somehow and I've been wanting to sew along, but always have a ton of other stuff going on. This month I decided was too good to pass up.
Here are the ones from this past month: 
Those would be 1. Where the Wild Things Are, 2. Blue, 3. David Bowie, 4. Pockets and 5. Great Britain.
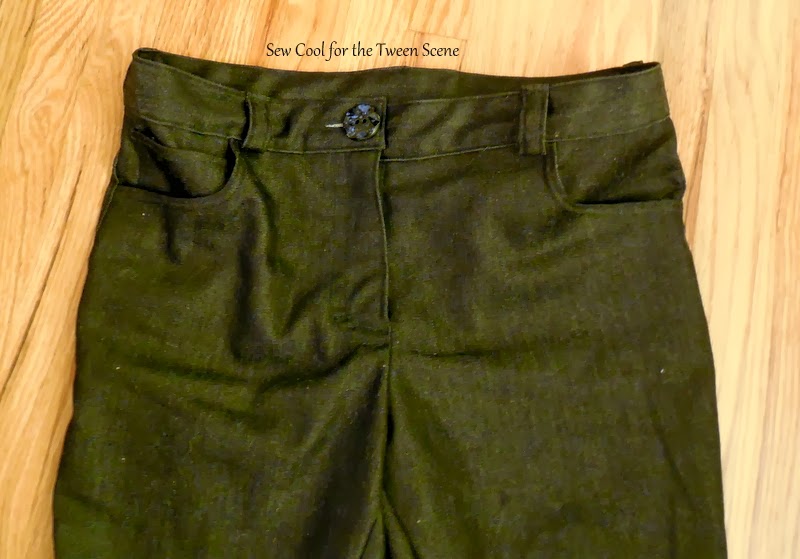
Now here is my outfit, which you can read more about over at Sew Cool for the Tween Scene. Can you see my 5 acorns incorporated in the outfit?  I leave the key at the bottom, but here are the pictures:


Where the Wild Things Are=Fuzzy vest, reminiscent of the Hairy wild things
Blue=blue on the button of the jeans and a blue zipper (just because I only had a navy blue one:)
David Bowie=White ruffly vest (think of the movie Labyrinth)
Pockets=on the pants with
Great Britain=a flag stitched out on each back pocket
How do you think I did with the acorns? And the best thing of all is that Sophia loves the outfit and needed each of these things (ok not the vest, but she had asked for a furry vest).

Monday, September 23, 2013

L-M-N-O Pea Coat: A Flip of the Study Hall Jacket

I'm linking this one up as part of my signature look over at Project Run and Play because this is truly Clara's signature look...color, pattern and a little flare. She had her hand in it all and it really does represent her well.

Here's the post from the "Flip" I wanted to put up, just to have here because I love this coat. It's finally cooled down enough that in the mornings it's a little chilly. Clara was wearing this coat today as she rode her scooter to school...it was so much fun to walk behind her and see the fun colors up ahead.
~~~~~~~~~~~~~~~~~~~~~~~~~~~~~~~~~~~~~~~~~~~~~~~~~~~~~~~~~~~~~~~~~
Sally here, from Daisy Chain Creations and can I just say how much fun I've had doing this 'flip'?  It's truly been a collaboration of minds with my 5 year old, which has made it rather fun...if not interesting. First we consulted on which of the 4 patterns to pick from the Pattern Anthology.  After we picked the coat, then we consulted on what we liked about the original and how we wanted to 'flip' it and finally we went shopping together to pick out fabric and buttons.
All of this team work resulted in the:
L-M-N-O Pea Coat
Here's a picture of the original 'Study Hall Jacket':
And here is the final result of my 'flip' a little reminiscent of the big thick wool pea coats worn by the Navy (I wore my dad's all through high school).
Now you might be asking why we picked the coat.  Well this little gal has grown a ton and she remembered that she had outgrown her favorite double breasted denim jacket she wore all of the time last winter.  She needed a coat, but we live in the South, so not too much of a coat.  That was what was nice about her denim jacket and that thinking led us to the L-M-N-O Pea Coat.
It's a nice loose fitting double breasted jacket that will allow her to wear sweaters on colder days, but not be too heavy during the mostly mild winter days we have here.
I cut the jacket out to a size 8, which she mostly fell under anyway (she's off the charts tall and solid), but  it still was on the loose size, again perfect for wearing a sweater if needed.
The biggest change was not using the waistband, but instead adding a few inches to the length.
  Even with all of my changes, the instructions were a dream to follow.
The outer fabric is a soft corduroy from the Brother Sister line carried by Hobby Lobby.
Some things that she wanted to keep were the zipper and the hood, so I did.  However, she doesn't like tight fitting hoods, so I left out the called for elastic in the hood.
The zipper stayed in it's original place, but I added a panel to the lining and a couple of extra inches to the outer piece in order to get the double breasted look, with actual buttons and button holes.
For the pockets, she really liked the ruffled welt pockets, so we kept those as is, but chose to do the ruffle from the lining fabric.
The sleeves I made a couple of inches longer and decided to forgo the ribbed cuff look. That way I could cuff them, again showing the lining (and allowing for her to continue to grow...without outgrowing the coat too soon).
For the lining, I used a pink flannel.  One thing she really wanted was an inside pocket, like dad's suit coat.  And she got exactly that, which she loves!  Just so it's not too hidden, I used the outer fabric for the pocket.
Not only will the coat keep her warm without being too warm, but it allows her to have room to play...always important for an active kindergartner.
Here you can see the hood as well as the little back sash with 3 more blue buttons and you can see the little split I made to the back so that she could move a little easier.
And there you have it, my L-M-N-O Pea Coat.
Here's a run down on the way I 'flipped' the original 'Study Hall Jacket' pattern:
1. I made it double breasted by adding a panel to the lining after the zipper and adding a couple of inches to the outer piece (this actually ended up being easier than I thought it would be--I might just do a tutorial on this step).
2. Added a hidden/inner pocket.
3. Made the sleeves longer and cuffed them instead of doing a ribbed cuff.
4. Added extra inches to the bottom of the jacket so that it hits at her knees, but added a split in the back to allow her to run and play.
5. Made a loose fitting hood and added a back sash.
 And here is the look that says "Mom, it's 85 degrees out and I'm wearing pants, long sleeve shirt and a coat...can we please be done?!"
And with that, we are done and I just have to say thank you to Ashley and Emily for having me be a part of this fun series!

Friday, September 20, 2013

Go Vote for a Flip!

Head over to Frances Suzanne to vote for you favorite 'FLIP' of September. 
Flip This Pattern

Of course if that happens to be mine, I wouldn't complain:)

Thursday, July 18, 2013

Whimsical Tunic with Side Ruching

Just something I'm bringing home.  It goes along with this post.

 Hello Project Run and Play readers!  It's Sally from Daisy Chain Creations, here to share a little detail that makes a tunic go from humdrum to whimsical...just add a little contrasting ruching (and an exposed yoke...but I'm not going to overwhelm you today).
While we are just wrapping up the school year here (2 more days!!!), I'm already thinking ahead to the next year and this little gal's wardrobe.  She'll be starting kindergarten and I want her to have some fun pieces that match her personality.  She pretty much lives in hand-me-downs, which is really nice, but not necessarily her...do you know what I mean?
That is how this tunic came to be.  She really liked the one I had made for her sister earlier this year, so I let her pick out the fabric for her first piece to go in her kindergarten wardrobe (hence the reason it's a little big...it is still 3 months away). We found the cute owl fabric at our local JoAnn's.
First, you want to start with a tunic like top.  You could use any top pattern and just extend it, but I just traced a pattern from a shirt that fit her on the large size (make sure you account for seam allowances).  You also want it to be a little longer, going below the waist so you can ruche it up.
Then you want to assemble the shirt and finish the bottom hem.

Now it's time to make the little placket and ties for ruching.  You could use ribbon if you didn't want to make the ties, just make sure you do something to the ends to keep them from fraying.
The placket pieces are 2 1/2 inches wide.  The length is up to you and how far you want it to go up the side of the shirt. For the ties you want them to be a couple of inches longer than your placket.  I made mine 1 inch wide.
Next you want to finish the bottom edge of the placket with a small hem. ( I skipped this step because the I had a nice printed selvaged edge, which I figured was just as good)
 Now you want to iron the sides and top in 1/2 and inch. 
If you are making the ties, fold them in half right sides together, sew and turn.  Then finish the edges.
 Here's what you end up with and now you are ready to assemble.
You also want to snip the ties in half.  You could potentially adjust this idea so that you use one continuous loop, but since I'm making it for kids I figured I wanted the top ends secure so I wouldn't have them getting pulled all the way through.
 Now you want to mark the middle of the placket lengthwise (I just marked the top and bottom, but you might want to mark a line down the entire length).
Pin it to the side seam, making sure to line up the middle of the placket with the seam. 
 Sew along your line in the ditch of the side seam, all the way from the bottom hem to the top of the placket. 
 Next you want to pin the ties right next to the seam, one on each side.  Let the ends stick out a little at the top.
 Now it's time to attach the rest of the placket.  First sew around the placket, up one side, across the top (I always back stitch and come back across to make sure the ties are nice and secure) and then down the other side.  First go around at 1/4 and inch.
 Now you want to snip the ends so that they are not sticking out.
 Still with me?  We're almost done.
Sew around the placket again, this time with an edge stitch.  I also added another row at the top to secure the ties  good and tight...we're talking about a 5 year after all, so who knows how much tugging she'll do with those ties.
 And there you have it...a cute ruched tunic.
Stop on over at Daisy Chain Creations to learn how to do the whimsical exposed yoke that you see on the tunic.
My first version of the tunic had the placket on the inside, which makes it a little less whimsical, but still fun to have some contrast going on.
Thanks for having me here on Project Run and Play!

Monday, May 13, 2013

You Are Going to FLIP for This New Series!

Flip This Pattern
Ready for a fun, new series?  Well this one will have you flipping for joy, because not only will you get to see 12 great patterns "in action", but you'll get to meet some amazing women who will be doing the sewing/competing. Plus there is sew along competition and prizes thrown into the mix. The lovely sister duo over at Frances Suzanne is hosting it. You'll want to save this one somehow so you won't forget to follow along!  It will kick off in June, so a grab a button and check it out!

Here's the line up...and yes I'm one  of them, but I won't be competing until September and then again in December.
cathgrace | Welcome to the Mouse House | S is for Sewing | Sewing Like Mad | Elegance & Elephants | Call ajaire Little Kids Grow | Daisy Chain Creations | Once Upon a Notion | Handmade Martini | iCandy handmade | you & mie If only they would Nap |  Foster Ramblings | Designs by Sessa | Shaffer Sisters {Jo} | greendoodle | Shaffer Sisters {Al} Siestas & Sewing | mama says sew | Sewing Mama RaeAnna | sewVery | Nap Time Crafters | {lbg studio} Shaffer Sisters {Scary} | Sweeter Than Cupcakes | Once Upon a Sewing Machine | Crafty Cupboard | The Powell Family
And here is the line up of patterns that will be 'flipped'.  See, I told you it's an amazing line up!
E & E Patterns oliver + s StraightGrain Pattern Anthology Figgy's Peek-A-Boo Pattern Shop Shwin Designs Clever Charlotte Violette Field Threads Blank Slate Patterns Heidi & Finn The Cottage MamaE & E Patterns | oliver + s | StraightGrain | Pattern Anthology  Figgy's | Peek-A-Boo Pattern Shop | Shwin Designs | Clever Charlotte  Violette Field Threads | Blank Slate Patterns | Heidi & Finn | The Cottage Mama

Friday, May 3, 2013

It's Time to 'Knock It Off' again!

Elegance & Elephants
Heidi, over at Elegance and Elephants, is hosting a Spring version of 'Knock It Off'. The challenge is to take a piece of children's clothing that is 'high end' and make it yourself for much, much less.
This time around I wanted to go casual.  For the winter, I made a fancy, yet very simple dress.  Last time I went Italian and this time I went French. I also went for shorts and a summery top this time around.  Guess which one costs more.
Here's the outfit I chose:
It's look #17 from Bonpoint and guess how much just the shorts and the shirt would cost you...around $300 according to the exchange rate I looked at for Euros.  That's just plain crazy!
Here's my look:
 My total cost--$5 maybe.
 I bought 2 yards of the fabric for with a 50% off coupon and probably only used 3/4 of a yard.    The shorts I just upcycled from a pair of jeans I got at Goodwill for 99 cents. The buttons were a dollar and I bought the gold colored jeans thread for just under $1 thanks to another 50% off coupon.
 I let Sophia chose the fabric.  I just wanted something light weight to mimic the look of the Bonpoint shirt, but I wanted her to love the shirt so floral it was.
For the neck and arm holes, I just used bias tape made from the fabric. I used the bias tape to make the bow too.
I really like how the shirt turned out! I just used my self drafted pattern for a button up shirt that I've used a ton of times now.  To get the little gathers under the back yolk, I just added 2 inches on the fold (4 inches total) to the back piece.  Then I just did the bias tape instead of a collar and sleeves.  I forgot that I was going to make the shoulder a little wider to make it hang over the shoulder more, other than that it is perfect and she loves it.
So to get this look you can use any button up shirt pattern. Just add the little extra to the back, don't add the collar or sleeves and finish with the bias tape instead.  Very easy and summery.
 The shorts however, turned out kind of funky, but she says they are comfortable and wants to wear them. The pants I used were more of a stretch jean fabric and I wish I would have gone with actual jean material because it turned and twisted a little.  
I simply cut the front from the pants, using a pair of her shorts as a guide. I included part of the zipper and the back I used the seam from the back middle. I also reused the waistband/belt loops. I just picked it off the jeans and cut to length which allows me to use the existing button hole as well.  
For the welt pockets, to remind myself how to do it I followed this tutorial.  There was plenty of fabric in these pants to get the pockets and welts. And I have plenty left over to attempt a pair of baby jeggings for a new niece. One thing about this stretchy fabric was that a thinner welt did not work.  Maybe if I treated it more like a knit it might have, but I would love to try it with actual jean material and see how it looks.

And here is the look:


LinkWithin

Related Posts Plugin for WordPress, Blogger...