This week's challenge was an exciting one to think about and plan (the actual sewing of the outfit is another story which you can read about further down in this post). A huge white sheet=a big blank canvas. How fun would that be right? That's the idea I went with in deciding to stamp/paint the sheet and in keeping it simple black and white. I wanted the look to be like I doodled in a way. Then it was coming up with the actual design. Here's the original look that we came up with. Both the jacket and the skirt came from the sheet. I was hoping to have enough for a shirt as well, but since both the skirt and jacket are lined with material from the sheet, there wasn't enough.

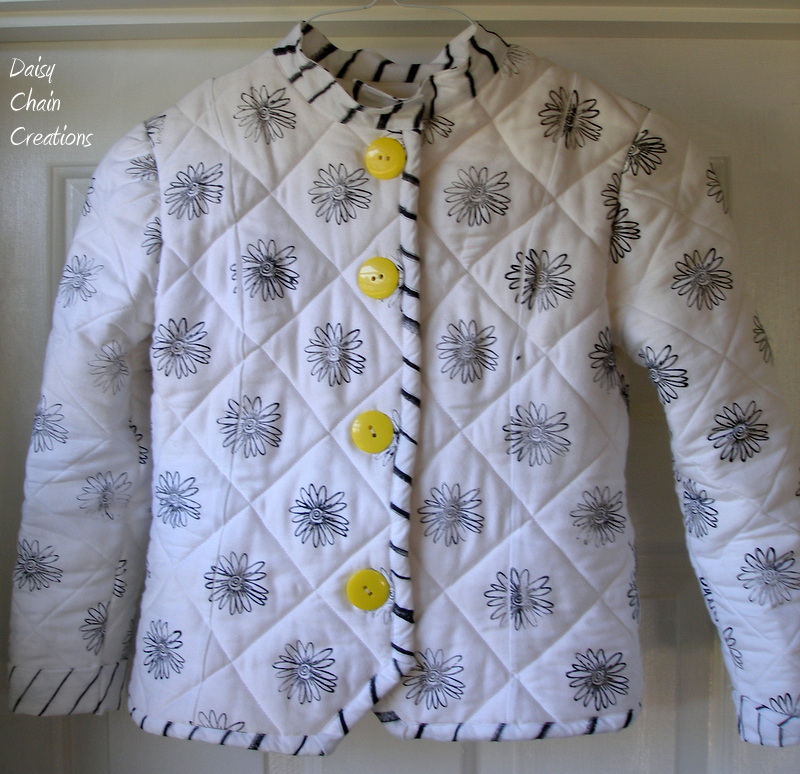
First part of the outfit--a quilted jacket. Something not too heavy, because it doesn't really get that cold here in the South, but something she could wear with both jeans and nicer outfits. It has 2 layers of thin cotton batting in there, which were leftovers from quilts that I helped tie and bind several months ago. Total cost for this project was $6 (sheet from Goodwill and buttons and zipper bought when JoAnne's had their Labor Day sale).
Here's an old jacket pattern I was wanting to try out (my mom has tons of old patterns laying around, which I love to go through every time I visit). Don't you wish they were still that price? I marked out the grid and stamped the flower in the middle before I had quilted it. Instead of a hood, I just added a simple stand up collar.
The skirt is just a simple A-line skirt, doubled since it is a white sheet after all, with an invisible side zipper. I hand painted the flower on to the skirt after I cut out the pieces but before I sewed it all together.
Here's a close up of the flower.
And here is the process of how I got the stripes for the bias strips I used as binding. I used Jacquard textile dye and just painted it on with a paint brush, not really caring if my lines were perfect (obviously). Then I cut it into the 2 inch strips that I needed. For the stamping, I just painted a thin layer of the dye out and the stamped away. After the dye dries you do have to heat set it with an iron.

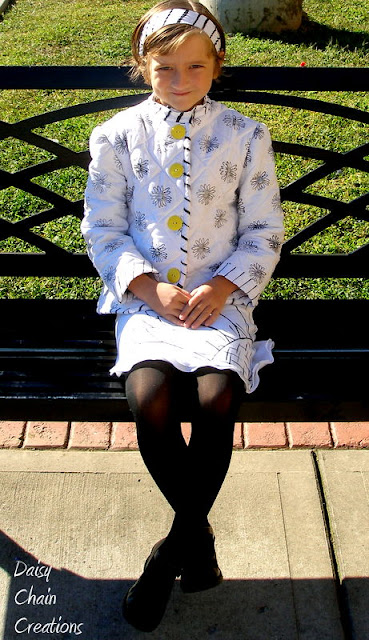
And here is the finished look, which she loves. That's the most important part, right?
-----Keep reading if you want to hear me complain----
So now for the complaining part. I was really excited for this week's challenge. Probably the most out of all of the themes they gave us. Really, who doesn't like a big blank canvas to work with? Maybe that was the problem, I had a vision and it didn't quite come out how I pictured it and what did come up was wrought with a ton of frustration.
Big blank canvas my foot...sheets are a pain to sew with. Or maybe it was just my sheet, anyone else out there have a problem with it? I did score a queen size cotton sheet at Goodwill, because I wasn't going to spend a ton on a new sheet I was just going to cut up...couldn't justify it since we still have 15 year old sheets on our bed which work just fine. Well it was hard to find the true grain, which was important since I was cutting things on the bias (the skirt most importantly). Then it stretched and tugged in places I didn't want it to. Seams didn't turn out the way I want. The invisible zipper would not lay flat. It was a giant frustration to sew this outfit. I had to make myself finish it, because I was ready to throw in the towel.

Then there was the jacket...this was my own fault. I wanted to use that pattern. I wanted to stamp and quilt it. Those 2 ideas did not mesh well together. The way the jacket was put together did not lend to making a true grid or to adding a lining of batting. Actually, it was kind of a neat way to put it together and fun to sew something that was different. There are 7 pieces to the jacket-2 front, 2 side front, back and 2 side back. You sew the 2 front pieces to the back piece at the shoulders. Then you sew the 2 side fronts to the 2 side backs at the shoulder and the side seams. THEN you sew the sides to the middle (front and back pieces) by starting at the bottom of the front and sewing up around the shoulders and to the bottom of the back. With me???? Make sense??????? Basically what it means is that seam that goes up and around the whole coat is kind of rounded. Rounded is not good with straight lines and a grid. That's where the frustration came in. Plus I couldn't just cut out the batting from the pattern pieces and quilt away. I had to sew the batting into the shape as well to fit it in between the outer part and the inside lining. Then there were seams in weird places which made it hard to stamp neatly.

Well I was tempted to start pointing out all of the things that drive me batty in these pictures, because it didn't turn out how I wanted or expected or shows the imperfections and my frustrations with it. But I won't and I'll just let you enjoy the cute pictures of a cute 9 year old, who looks much too old to be my little girl.
The red caboose did make for a fun photo shoot. Actually, all 3 places we stopped (all within 2 or 3 miles of us) are places that are fun to take pictures.




 It's hard to craft for a 12 year old boy, do you know that? And seeing that I really want to stick to our 3 gift--1-something special that they want, 1-book, 1-something made by me--I have to think really hard to come up with something. This year I had this brilliant idea, a book with a hidden compartment to hide something that keeps getting found by the younger brother. All I did was google how to make a hollowed out book and found lots of help. I have since deleted the bookmark of the actual one I used (this only works if it remains a secret after all), but they were all pretty much the same and most were easy to follow. I hunted for a book big enough at a local thrift store and then went to work. Between cutting out about 1000 pages with an exacto knife and the carving for the girl's gift, I think I gave myself carpal tunnel. So far, the book has served well as a hiding place for a certain electronic gadget that he doesn't want others to find.
 This is just one of the two capes and crowns that I made for 2 of my nephews. The other cape was yellow and the 'N' was on blue. I hope they like them and that CA has 2 new super heroes. Their little sister got some magnetic dolls and a purple crown (I forgot to take a picture of the dolls).
 Then the newest member of the clan got this little onesie and 2 of these birds (they really do make great chew toys). She was born on Dec 18th (I think I have that right), but they didn't find out what they were having, so I had to make the gift gender neutral. The onesie was made using the freezer paper method of stenciling.


 Another baby gift I've been doing, personalized onesies made with the freezer paper stencil technique taught to me by this lovely lady. (Don't hate me Val, for using this link:) The kids have had fun coming up with the picture to be put in the middle. It's always something that starts with the same letter as the name. Get it?
 I'm into knitting now. It's my therapy and it's productive at the same time. All the kids are getting hats as well as many babies. Here's the pattern I used for the boys hats. Here's Ethan modeling his. I loved the decrease in this one and I think I will use this one a lot.
