Showing posts with label guest post. Show all posts

Friday, February 13, 2015

Free For All Flip--Pleated Kick Pleat Skirt

The lovely ladies over at Frances Suzanne are changing up their FLIP Series a little this month. All month long they are spotlighting FLIPs of free patterns/tutorials.
So here is my most popular post...all time, my tutorial for a Kick Pleat Skirt (it's also one of my favorite things I've made).  So if you need a reminder here is a picture of the original finished skirt.
For my FLIP I turned it into a dress and changed up the kick pleats.
It's really hard to tell in the pictures, but I pleated the small panel used in the kick pleat. I did this by using the stripes in the fabric as a guide and just kept pleating so that only the maroon shows.  It also gives the kick pleat more of a...kick so to say. Even though the skirt is kind of fitted she has no problem walking in it.
As for the top, I just used the Ethan Shirt pattern again (other versions here and here), so you could say this is a double flip:)
I kind of like how she can dress this up or down.  My original vision was more flapper girl/20's style...but it turned out a little different after consulting Sophia.
Here's a picture where you can see the pleats a little better. We also went sans bow because it just didn't go well with the style of the dress or with the busyness of the stripes...running down the middle of the white stripes is also a silver stripe that doesn't show up in the pictures.  It really is a pretty fabric (JoAnn's in the red tag fabric section) and is kind of a nod to the Pantone Color of the Year--Marsala. The stripes aren't quite maroon (I know that because I couldn't really find buttons to match), but more of a wine color, just like Marsala.
Make sure you check out the Kick Pleat Skirt Tutorial if you want to make a fun yet little more 'grown up' looking skirt! And make sure you check out the other fun creations and look at the crazy/amazing list of FREE!!! tutorials and patterns over at Frances Suzanne!

Monday, November 10, 2014

Betty Skirt Tour

So a couple of weeks ago I learned I was the lucky winner of one of the Abilmente Prize packages given by Annika over at Naeh-connection (seriously, I felt like it was Christmas morning) and part of the package was this lovely bundle of Cotton and Steel "At the Zoo" from The Fat Quarter Shop.
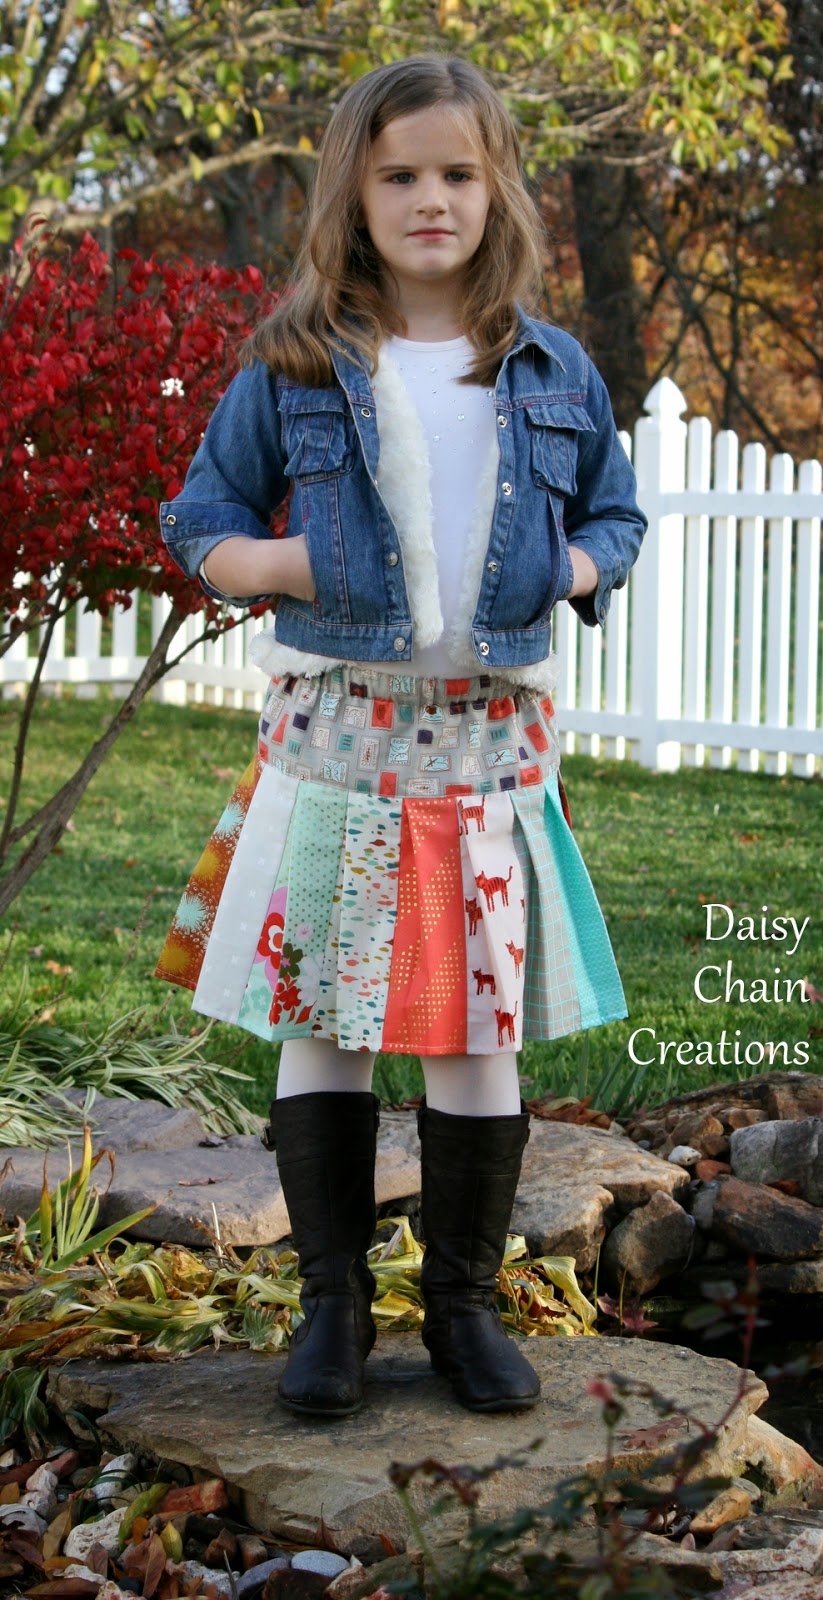
I decided that the fat quarter bundle would be perfect to make this pieced Betty Skirt, since I get to be part of the Betty Skirt Tour.
The lovely ladies over at the Shaffer Sisters have put out this great basic skirt pattern that has tons of options. The Betty Skirt makes a great go-to skirt because it's simple to make, but the pattern allows you to personalize it to suit your needs.
I chose to do the large pleated option, but decided to make each pleat a different fabric from the bundle. This worked out perfectly because the longer width of the fabric was exactly twice what I needed, therefore the front and back pleats are exactly the same.
To get the pleats, I took the measurement of the pleat guide between pleats and added a seam allowance of 1/2 an inch, cutting the strips to the length I needed. Then I sewed them all together, pleated it (using the seams as a guide...no marking needed) and added it to the yoke.
This silly girl loves how it turned out. Even my 11 year old likes (and since they kind of wear the same size...I think she has her eye on it). The fabric was lovely to work with and such a visual treat!
As for the Betty skirt...you just need fabric and elastic (you do need buttons for the one with the placket) and that is it! It comes together fast, comes in a huge range of sizes, and has well written instructions.
Another plus...it's got great twirling factor...that means a lot in this household.
So if I've piqued your interest, you should go and check out the other stops on the tour...there's been some beautiful creations, and then go and buy it yourself with the discount code!
Displaying betty-skirt-tour.jpg

Now for a slightly random change of subject...this is my normal camera lens (it is just the kit lens...nothing special). It wasn't working so thanks to the invention of YouTube I thought I'd try to fix it myself. It was going to cost more than a new one (and the cost of the camera itself, since I bought it used) to get it fixed, so I thought I'd give it a go. I figured out the problem, ordered the part and all that is left is for the part to arrive and me to hopefully assemble it back together perfectly:)  I've been using my distance lens for my pictures the last little while...there's been a learning curve, but I do like how some of them are turning out.

Tuesday, October 28, 2014

Pumpkin, Pumpkin, Pumpkin Eater...Over at GYCT

 I'm over at GYCT celebrating 31 Days of Halloween, but if you remember from last year, I'm not a big fan of this particular holiday. So this year I decided to share something a little more Autumn oriented...3 delicious recipes that incorporate that festive gourd.
Be sure to check out all the other great ideas that have been shared!


Displaying 31daysguestposts2014.png

Tuesday, July 8, 2014

Are you moving?--Organizing Guest Post

Image Map
Howdy Ho...while I'm still unpacking and organizing here at home, I'm over at GYTC sharing some tips to help a move go smoother. Not completely smooth, because there are always some unexpected bumps in the road (like your desk top not wanting to recognize the new wireless connection or the fact that the different schools have people there on different days so that I can't register all the kids on one day...that would be too easy). 

So until I get my sewing room unpacked, which is surprisingly low on the list right now...family sanity is much more important at the moment...here is something to think about and pass on to someone you know that might be moving.

Thursday, May 15, 2014

Meet My Machine

Today I'm over at Sewistry sharing my thoughts on the machine I own, Emerald 118 Husqvarna/Viking. 

Go check it out!
Displaying SMM button.jpg

Thursday, December 12, 2013

It's 'Flip' Time Again

 
 This time I flipped a pants pattern into a skirt and Sophia was the lucky recipient. If you want to read more, go check it out at Frances Suzanne!

Monday, September 23, 2013

L-M-N-O Pea Coat: A Flip of the Study Hall Jacket

I'm linking this one up as part of my signature look over at Project Run and Play because this is truly Clara's signature look...color, pattern and a little flare. She had her hand in it all and it really does represent her well.

Here's the post from the "Flip" I wanted to put up, just to have here because I love this coat. It's finally cooled down enough that in the mornings it's a little chilly. Clara was wearing this coat today as she rode her scooter to school...it was so much fun to walk behind her and see the fun colors up ahead.
~~~~~~~~~~~~~~~~~~~~~~~~~~~~~~~~~~~~~~~~~~~~~~~~~~~~~~~~~~~~~~~~~
Sally here, from Daisy Chain Creations and can I just say how much fun I've had doing this 'flip'?  It's truly been a collaboration of minds with my 5 year old, which has made it rather fun...if not interesting. First we consulted on which of the 4 patterns to pick from the Pattern Anthology.  After we picked the coat, then we consulted on what we liked about the original and how we wanted to 'flip' it and finally we went shopping together to pick out fabric and buttons.
All of this team work resulted in the:
L-M-N-O Pea Coat
Here's a picture of the original 'Study Hall Jacket':
And here is the final result of my 'flip' a little reminiscent of the big thick wool pea coats worn by the Navy (I wore my dad's all through high school).
Now you might be asking why we picked the coat.  Well this little gal has grown a ton and she remembered that she had outgrown her favorite double breasted denim jacket she wore all of the time last winter.  She needed a coat, but we live in the South, so not too much of a coat.  That was what was nice about her denim jacket and that thinking led us to the L-M-N-O Pea Coat.
It's a nice loose fitting double breasted jacket that will allow her to wear sweaters on colder days, but not be too heavy during the mostly mild winter days we have here.
I cut the jacket out to a size 8, which she mostly fell under anyway (she's off the charts tall and solid), but  it still was on the loose size, again perfect for wearing a sweater if needed.
The biggest change was not using the waistband, but instead adding a few inches to the length.
  Even with all of my changes, the instructions were a dream to follow.
The outer fabric is a soft corduroy from the Brother Sister line carried by Hobby Lobby.
Some things that she wanted to keep were the zipper and the hood, so I did.  However, she doesn't like tight fitting hoods, so I left out the called for elastic in the hood.
The zipper stayed in it's original place, but I added a panel to the lining and a couple of extra inches to the outer piece in order to get the double breasted look, with actual buttons and button holes.
For the pockets, she really liked the ruffled welt pockets, so we kept those as is, but chose to do the ruffle from the lining fabric.
The sleeves I made a couple of inches longer and decided to forgo the ribbed cuff look. That way I could cuff them, again showing the lining (and allowing for her to continue to grow...without outgrowing the coat too soon).
For the lining, I used a pink flannel.  One thing she really wanted was an inside pocket, like dad's suit coat.  And she got exactly that, which she loves!  Just so it's not too hidden, I used the outer fabric for the pocket.
Not only will the coat keep her warm without being too warm, but it allows her to have room to play...always important for an active kindergartner.
Here you can see the hood as well as the little back sash with 3 more blue buttons and you can see the little split I made to the back so that she could move a little easier.
And there you have it, my L-M-N-O Pea Coat.
Here's a run down on the way I 'flipped' the original 'Study Hall Jacket' pattern:
1. I made it double breasted by adding a panel to the lining after the zipper and adding a couple of inches to the outer piece (this actually ended up being easier than I thought it would be--I might just do a tutorial on this step).
2. Added a hidden/inner pocket.
3. Made the sleeves longer and cuffed them instead of doing a ribbed cuff.
4. Added extra inches to the bottom of the jacket so that it hits at her knees, but added a split in the back to allow her to run and play.
5. Made a loose fitting hood and added a back sash.
 And here is the look that says "Mom, it's 85 degrees out and I'm wearing pants, long sleeve shirt and a coat...can we please be done?!"
And with that, we are done and I just have to say thank you to Ashley and Emily for having me be a part of this fun series!

Tuesday, August 27, 2013

My New and Improved Sewing Closet

Time to bring this one home. This was one of the things on my to do list this summer.
~~~~~~~~~~~~~~~~~~~~~~~~~~~~~~~~~~~~~~~~~~~~~~~~~~~~~~~
Hi there GYCT readers! Sally here from Daisy Chain Creations, where I blog about my crafting endeavors.  I'm here today to share with you how I organized my sewing closet. 

In my dreams, I would have this amazing craft/sewing room (I could post pictures of the ones that make me sigh, but I won't). One where I could leave my sewing machine out, my projects on the cutting table, with a comfortable chair and a lovely painted room.  Since that is not coming true anytime soon (I'm talking when the 2 oldest are off to collage...which actually is closer than I'd like), I've decided to show you my closet "make over" and share a few tips on how I make a "portable" sewing room work.

Here's the before pictures of my closet, which I'll admit is probably at it's worst since we moved into the house 2 years ago.  With the end of school and summer travel, I just kind of piled in things.  The closet also doubles as the vacuum storage and work out equipment storage.  This is just our closet by the side door to our house.  The shelves were there when we bought the house.
Here's the nice spacious closet empty. It really is a nice sized closet...a lot better than the 3 drawer dresser I had when we lived in a 2 bedroom apartment...so I shouldn't complain.
Here is all of the stuff that was in the closet.  When it came to organizing, I tried to put all the like things together as I took them out.
I also made a note of what didn't work about how I had arranged things before.  Here's the short list:
-I was buying doubles and sometimes triples of thread colors because I couldn't easily see what I had.
-I couldn't see or get to my fabric easily.
-I had things I hardly used on the shelves at eye level.
-My little drawers were just full of stuff and not well organized.
-I needed a place to keep my ongoing projects where I could see them and keep them in mind...so I would finish them:)  Projects were currently stuffed into a basket.
And here is the after.

I put all of my fabric where I could easily see it and organized it by colors and or types of fabric.  The basket up in the left corner has all of the 'specialty' type fabrics that don't fold and stack easily.  In the top right corner is stuffed the bags of batting.  The little containers have been sorted and labeled.  I also organized and labeled the little drawers.  The bags on the bottom left are just those reusable shopping bags. One has my scraps that I'm cutting into squares for my quilting mother, another has the things that needed to be mended and another has the scraps that my kids can use for projects and fun.  I wanted to make them easy to grab and pull out, without making a mess or having to rummage.  If I'm watching a movie I can now just pull out the bag of mending or cut some squares.

This is probably the biggest change.  I wanted to use the door space some how, but couldn't nail or screw anything into it...so nothing too heavy, everything is hung up with the command strips.  Here's what I added: the thread holder for my most used threads, a magnetic board to keep track of my "commitments" and a cork board that will now hold reminders of what I need for upcoming projects...hopefully this means less trips to places like JoAnn's and Hobby Lobby.
 And one final look...it no longer doubles as the work out equipment storage, but I do have to fit the vacuum in here because there is no other place to put it.
 Like I said, I kind of look at my sewing room as portable. I sew in what would be the dining room of our house, but for us is the music room.  That little folding table is where I put my sewing machine when I set up shop.  I just like to be able to take it down when we have company coming.  Because sometimes this is a quick set up/take down time I have some things to help in the process. 
The biggest help is this basket.  As I grab my machine and table, this is right there ready to go as well.
I keep in here the things I need at my fingertips when sewing.  I also use it to keep the current project in the works contained if I have to take down shop.  Then when I set up again, it's all right there.
This is just what I consider my essentials.
 This is the other thing that I added that will hopefully help me be a little more focused and keep things from getting piled up in the closet.  You see a lot of the piles were actually projects that I had in the works...sometimes I like to multitask and work on a couple of things at a time.  It keeps things interesting.  
The original idea came from here.  This idea caught me eye because I was trying to think of a way to utilize the hanging space of the closet.  I just got some pants hangers, gallon zip lock bags and came up with this little print out that helps me to know what I have going on with each project. Each bag contains one project. As I gather the things for that project they go into the bag and then when I want to work on it, I can just grab it.
 Here's the print out.  I added what I did, because I sometimes need to know why I'm making something...sometimes it's not for me or it's at the request of someone else. Sometimes I have a timeline/deadline, so I included that as well. For the supplies, I divided it up so that I could take an inventory of what I already had and then needed.  Then I added the bottom a 'Things to buy' section that I cut off and pin to my board.  The 'Ended up Using' box and the comments box are more for blogging purposes.  It's nice to know what fabric I used and so on, so now I just jot it down. As for the comments, since I grab the bag and take it to my sewing machine, I can write things down as I go that I want to remember to write about in the blog post.
 
So there you have it.  Hope this helps you get your sewing space a little more organized!

Friday, August 9, 2013

The Wheels on The Bus

Today is back to school time for my kiddos and I've got one starting kindergarten this year. Yikes! How the time flies...and she's my last.
Perfect timing for all of this back to school hullabaloo is this 'Back 2 School' pattern bundle (We're talking 9 patterns here!) offered by Chelsea from Get Your Crap Together.
After some consulting with Clara on what she wanted here is what we came up with. I declared I was going to use the bird print canvas (picked up from my mom's stash this summer) and she picked the other fabrics and lucky me, I already had some zippers to match.
The pencil pouch is perfect for holding all of school's necessities all in one place and will surely get a lot of use. The only thing I changed was that I added a row of top stitching by the zipper to keep the lining in place for her little hands which are still getting the hang of a zipper.
 Here's a peak inside...I just love the bright pink polka dot that she chose.
The coin purse is exactly the same as the pencil pouch, but smaller and perfect for keeping that lunch money in one place.
 The crayon roll is probably her favorite and has been carried all around the house. I love how I was able to tie in all 3 fabrics with it.
  It sewed together really fast and Chelsea's instructions are spot on and easy to follow.
 Clara has seriously colored so much more since I made this for her...if I'd only known I would have sewn one long ago:)
One final look with it all wrapped up.
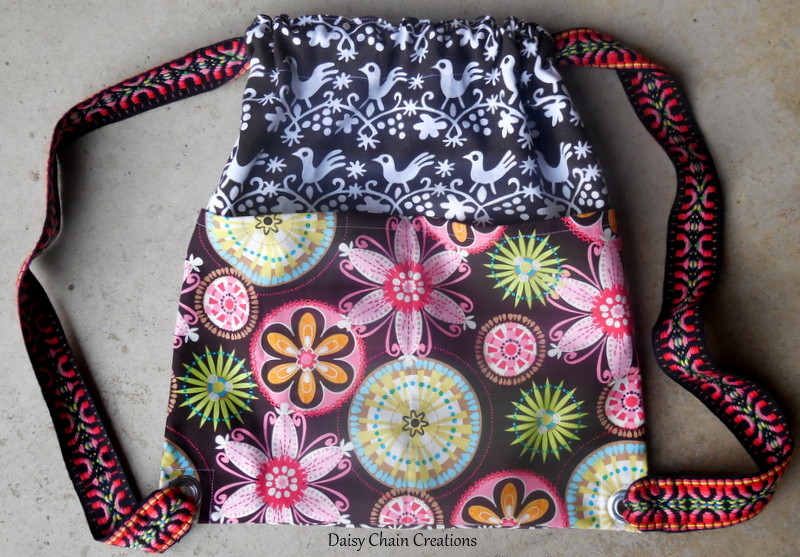
 Okay, I take that back, this is definitely her favorite and has been on her back for a week now. I've had to ask her to take it off at meal times and bed times many times this week. 
Again, the bag sewed up really fast and the instructions were great, especially for attaching the straps of the bag.
I used some awesome woven cording (again from my mom's stash) instead of ribbon. I like how sturdy they seem.  At Clara's request, instead of sewing the cording into the bottom of the bag like the instructions said to, she wanted the "metal hole things like in the brother's bags (their sports bags)", so I added grommets and then sewed the cording extra good together after looping it through the holes. 
 And there you have her complete set...all ready for kindergarten!
 Check out Chelsea's blog for more "Bus Stops" and for a great give-away of her pattern pack!
Get Your Crap Together

LinkWithin

Related Posts Plugin for WordPress, Blogger...