Showing posts with label costumes. Show all posts

Monday, October 28, 2013

Extra Extra Read All About It

This year Sophia decided she wanted to be a Newsie for Halloween. I made her a vest and some knickers to complete the outfit.  Go check out my review of the vest pattern I used over at Sew Cool for the Tween Scene.

Thursday, April 18, 2013

Special Field Trip=Special Occasion--PR&P

At my daughter's elementary school, 4th grade is a big deal because they get to go on this awesome field trip.  They go to the plantation in our little town, which had a part in the battle that occurred here during the Civil War. It's an all day field trip and they are supposed to dress up.  I figured this counted as a special occasion, because it is a much anticipated event (she's been counting down the days for a couple of months now) that really only occurs once for them.  That constitutes a special occasion in my book and so I think it fits the bill for this weeks theme over at Project Run and Play.

For my daughters outfit, I designed the Civil War era dress, bonnet and apron.
She picked out the brown print for the dress, after we did a little research on prints from that time period. The bonnet is made out of some brown floral I had in my stash and the apron is just unbleached muslin.

Here she is wearing the snood that I had to wear for one of my summer jobs.  I grew up in Gettysburg, PA--another famous battle field--and worked at the Farnsworth House as a hostess/waitress.  We had to wear a dress, apron and the snood.  It was a fun job, because I got to interact with people from all over. Making this outfit reminded me of that summer.
It was very windy today when we took the pictures and the snood wasn't staying on very well, so the pictures don't look that great but I like how they make her look more dignified, while the bonnet makes her look pioneerish.

The bodice is loosely based on the shirt pattern I drafted a while back. I added a little extra on each front piece so that I could do 3 pleats on each side of the placket. And instead of a collar I added some of this vintage lace.
The sleeves were going to be much simpler, but she requested 'puffed sleeves' (Anne of Green Gables anyone?)  The skirt is just a simple gathered skirt, each panel being the width of the fabric, and then attached with  a waistband.  At the bottom, there are 2 pleats as well. Did you know in this time period, pleats were functional first and as an after thought decorative?  With long dresses, the hems would wear out, so you couldn't just simply let down the hem when you needed to make a dress longer.  That would leave you with an awfully frayed line, but pleats would not wear out so you could let those down.
Close up of the bodice.  I like how the lace kind of makes the dress. I had to restrain myself from adding more and keep it at simple is better. Here's another fun fact about the sewing process. I very rarely sew with one direction printed fabrics. I had to unpick many things and flip them around because I had the print upside down.
Here's a picture of the lace that I used. I get to raid my mom's stash when I go home every summer, and this was one of my finds.  Don't you wish you could get 2 yards for 79 cents still?
Here's a picture of the bonnet. Making these used to be second nature.  My mom would make a ton of these to sell in local shops (Gettysburg is filled with touristy type stores) and we would be enlisted to help. From a very young age, I started by helping to snip the string of ties apart as my mom mass produced them. Then you would graduate on to cutting out the pieces to actually sewing. 
And some final shots.  I wonder if I could convince her to wear the dress when we go to Gettysburg to visit this summer.  We plan on doing a bunch of the 'Living History' programs that will be going on around the battlefield. It's the 150 anniversary of the Battle of Gettysburg this year, so it's a big deal. I think it would be fun to get more wear out of the dress.

I'll be linking up to Train to Crazy

Friday, February 22, 2013

Quiet and Calm--This Week's Crafting

My crafting this week consisted of coming up with a costume for my 6th grader to make him look like Constantine.  Here's what we came up with:
circlet made from gold floral wire with a thin strip of felt whip stitched over the part where I twisted the two ends together.  Then we spray painted random fake leaves gold and hot glued them on(the felt served to cover the ends of the wire and to have a place to glue the leaves to).  The white drapey thing that went over one shoulder and pinned on the other is just 2 yards of white knit I have on hand for another project.  The gold brooch is 9 strands of the gold floral wire braided together and then twisted in a circle.  Then we spray painted it and glued it onto a white piece of felt that had a safety pin attached to it.
I didn't get a picture of him wearing it though.  He did look kind of spiffy.  Here's a bust of Constantine...not much to go on.
 I've also been working on this project.  I was working on this last year and only got to May, so maybe I'll get the rest done this year and get the sashes on the side sewn on.
(pattern by Sarah Jane)
Every time Project Run and Play wraps up, I take a break from sewing for a week or two.  But I'll be pulling out my sewing machine next week for some fun things to come.

Monday, August 27, 2012

Accessories to Dance

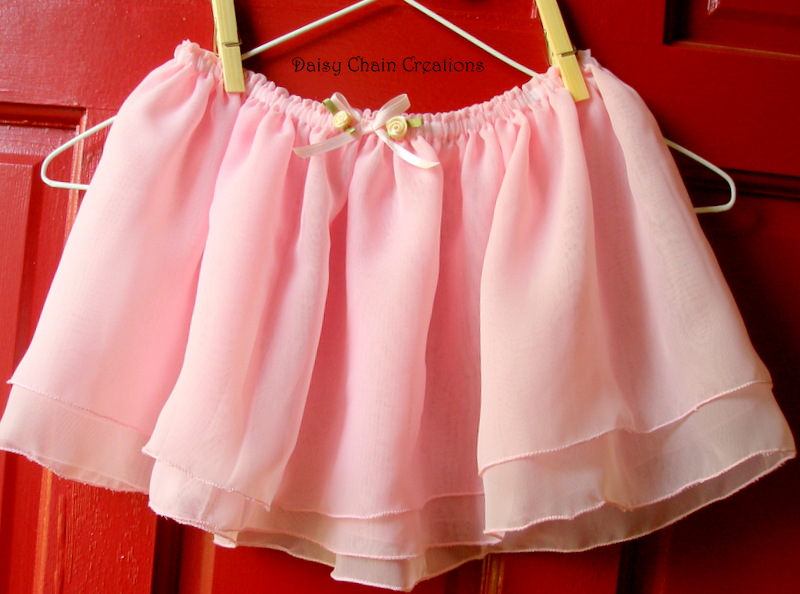
Can I just say that I love being able to sew?  When I do something like these ballet skirts, I feel like I just did something very clever.  Why you ask?  Well we were out buying the ballet tights (learned the hard way to buy the real deal that you have to try really hard to get a run in) and a new leotard for each girl at a dance wears shop, since they have both grown and the girls both wanted skirts to go with the leotard.  After looking at the price tag of $28 for something similar to the pink and $35 to a black wrap around, I decided that I could easily make them (and as long as each girl promised to leave the dance store without throwing a fit or getting whiny for not getting what she wanted).  A trip to JoAnne's, $5 and an 1 1/2 later here are the results: 
 The pink one is simply a yard of fabric folded over not quite half way.  At the fold I made the casing for the elastic and then sewed on some roses and a bow.  Very simple.  I'm not quite sure what kind of fabric I used, just something sheer and flow-y from the fancy apparel fabric.  It was 50% off, so that was the clincher.  To finish the bottom of both skirts I simply did a tight but wide zigzag all the way around.

For the black skirt I gathered the waist a little so that the finished length was 1 1/2 of her waist measurement.  Then I just folded a ribbon over it that was long enough for the tie on each side as well and stitched from end to end, making sure the skirt waist was completely secured in the fold of the ribbon.
Pretty simple, not very time consuming and I got a good felt like I 'stuck it to the man' so to say by not spending a fortune on something so simple.

Thursday, August 16, 2012

Mass Production

Have you ever had to mass produce something?  I think this is my first go at producing a lot of one thing.  When my oldest son signed up for marching band, I put on the volunteer form that I sew and had costume making experience.  After avoiding such positions as being in charge of all of the uniforms (there around 170 and I would have to be at every football game and competition to make sure each and every kid was properly dressed), I got a call to help make the costumes for the color guard.  They needed someone to draft a pattern for a hood and then be able to sew them up.  All something that was doable for me from home and there are only 30 to make.  Still 30 is a lot of one thing.
This is the crazy $22 a yard fabric (that means I have over $500 of fabric in the first picture...kind of crazy thought).  It looks kind of cool and when I took it into JoAnne's to get enough(before the actual order was placed at the special place they get their fabric) to make a mock up of my pattern to get it approved, they said they would be carrying something like it with their Halloween fabric if you are interested in it.
Here's the hood on some smaller models.  I like how it turned out and so do the people in charge.  The actual hood comes together in 15 minutes.  It's 4 pieces, 3 seams and then attaching the hood to the shoulder piece.  However, they want this velvety trim around it.  Putting that stuff on is a pain.  It's slippery on one side, velvety so it won't slide at all on the other and stretchy.  Putting that on makes it almost an hour for each hood.  I am getting a little faster, but the fact that basting it leaves holes makes it hard to get on just right.
Here's the pile of everything cut out.  I have the head pieces sewn together and the shoulder pieces together.  Next step, the trim around the head piece.  Give me a day or two and I'll post instructions on how to draft a pattern for your desired size and how to put this together.  It's really not that hard and might come in handy for Halloween:)
I haven't quite decided what kind of costume this would be good for.  The metallic (and shape of the hood) tends to look like something for a knight/medieval.  But the rattiness of the tears in the fabric make me think zombie.  Maybe I should ask my kids to see what they say.  One has asked for a cape out of it though.

Friday, March 2, 2012

The Mondrian Dress

This is called the 'Mondrian Dress' made by Yves Saint Laurent in 1965.  It was inspired by Piet Mondrian's paintings, which have always fascinated me.  When Sophia asked if I would make her a 60's inspired dress for her Groovy Rock and Roll Read-a-thon, we googled 'iconic 60's fashion'.  This dress showed up a bunch of times and we thought it would be fun to try and recreate.  I started with this old pattern and really just used it as a guide, not even pinning the pattern pieces to the fabric.  The only exception were the sleeves, which I ended up just making them as short as possible.
 Then I cut out the blocks from the cheapest polyester fabric I found at Joanne's.  The back and front are really opposites, instead of mirror images.  Because Sophia is a little shorter than your typical model, I chose not to add the big white section in the middle.  I liked the colors better than the white.  I decided to go with a simple one button loop closer in the middle of the back (piece on the right) I'll add that picture when I get a minute.  Once I had the colors to my liking, I basted them on to the white (the white is one big piece I used as the main piece.  I made two of the white shifts so that I could line it as well.  I just sewed the neckline and flipped it in and then added the capped sleeves.  I really made this all in an afternoon, so I went with the quickest way I knew how.
The black lines are just single fold biased tape.  I added the black after I had the front and back assembled, but before I added the lining.  To hide all of the ends, I did all of the vertical lines, but one side one first (the side ones would be caught in the sleeve seam and hem).  Then I added the 2 horizontal ones and finally did the last vertical seam, making sure to catch all of the ends.
 It was a little windy while we were doing the photo shoot (there was actually a tornado warning at the time, but we only got a little wind).
Finally, I made a headband to match.  Probably going a little overboard, but it was fun to make and she has already declared she'll wear it with other things. 

Saturday, November 5, 2011

On going projects


Taking a thrifted sweater and turning it into a dress for my 3 year old. Finished look coming soon...I just need to fix a few kinks.

Thrifted table (thanks to my friend Cynthia!) getting a new life...almost done with the sanding. Need to have it done before Thanksgiving because we need the seating it will provide.

The extent of my Halloween crafting was Sophia's witch hat. She was a stylish witch, so we got a cool pheasant feather thing from JoAnn's and added it to this felt hat that I had made. I also added some black feather boa pieces around the sleeves and hem of her skirt. Except for writing 'Camp Half-Blood (Percy Jackson) on an orange shirt, I didn't do anything else for costumes this year and that is just fine by me.

Thursday, January 13, 2011

Christmas Crafting Part 2--Gifts for #1 and the Nephews and New Niece

It's hard to craft for a 12 year old boy, do you know that? And seeing that I really want to stick to our 3 gift--1-something special that they want, 1-book, 1-something made by me--I have to think really hard to come up with something. This year I had this brilliant idea, a book with a hidden compartment to hide something that keeps getting found by the younger brother. All I did was google how to make a hollowed out book and found lots of help. I have since deleted the bookmark of the actual one I used (this only works if it remains a secret after all), but they were all pretty much the same and most were easy to follow. I hunted for a book big enough at a local thrift store and then went to work. Between cutting out about 1000 pages with an exacto knife and the carving for the girl's gift, I think I gave myself carpal tunnel. So far, the book has served well as a hiding place for a certain electronic gadget that he doesn't want others to find. This is just one of the two capes and crowns that I made for 2 of my nephews. The other cape was yellow and the 'N' was on blue. I hope they like them and that CA has 2 new super heroes. Their little sister got some magnetic dolls and a purple crown (I forgot to take a picture of the dolls). Then the newest member of the clan got this little onesie and 2 of these birds (they really do make great chew toys). She was born on Dec 18th (I think I have that right), but they didn't find out what they were having, so I had to make the gift gender neutral. The onesie was made using the freezer paper method of stenciling.

Monday, November 15, 2010

Poodle Skirts

Nothing like using your brain to figure something out sans pattern. These skirts made me do just that. They are complete circles and I had to figure out how big to make the holes in middle. I ended up doing Sophia's with a waistband and button closure. Clara's is just gathered with elastic. Really not much sewing at all since they were really just one big circle, just finishing the waist and then I zig zagged the hem. Hobby Lobby sells the iron on poodles (only in pink) if you ever need them in the future.

Sunday, June 7, 2009

Flower Fairy Skirt and Crown

I love creating something new without a pattern. A lovely idea floating in my head that worked out just right (for every one of these, there are probably 10 that either don't make it out of the floating stage or that don't work out just right).

This idea was for a birthday present for a lovely little 'Mia'. I had saved the fabric scraps from many dress-ups that I've made, one day hoping to make a crazy quilt, but then decided on this idea: A skirt made out of 'petals' with a couple of leaves and then I added ribbons and some silk flowers tied to the end. I thought it turned out quite lovely. I was determined to use just what I had (including using up all of the random pink thread I had--there are 3 different colors included) and only ended up having to buy a spool of pink ribbon. I just didn't have any to match.

LinkWithin

Related Posts Plugin for WordPress, Blogger...