Showing posts with label project run and play. Show all posts

Thursday, February 6, 2014

Asymmetrical French Country

Weird title for a signature look, right? Well there's a story. But first let me tell you how hard it was to get these pictures...sick kiddo and frigid weather (why oh why didn't I have the outfit done when it was 65 degrees 4 days ago?!). But we did it and may I present:
Asymmetrical French Country
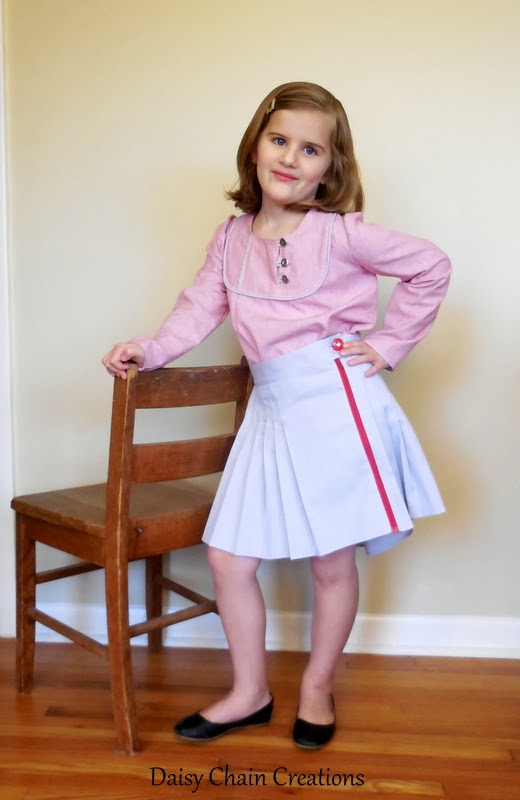
 Now for the outfit and the story behind the name.  It started with a gray shirt my husband was getting rid of (this outfit almost became the one for last week). I looked at the gray fabric of the shirt and envisioned this skirt with a separating red zipper down one side. I think I've liked the gray and red color combo ever since seeing this family picture session over at Design Mom. 
Well the skirt evolved a little to include pleats and the natural curve of the back of the shirt and a button with a little bling that Clara picked out from my button stash. 

I've always had a thing for the French kids clothing companies (my favorite is Bonpoint). And as my outfit evolved, it seemed to fit what I saw in their lines, so hence the French Country look.
 The thing about me is I'm not really bold when it comes to my sewing. I rely on the little things to grab your attention. Instead of bright colors or bold patterns, I go for the subtle eye grabbers. That is where the asymmetry comes in. I wanted the zipper offset to the side. I wanted to yoke to meet at the side of the shirt, so everything became asymmetrical.

And as I sketched out the outfit, I thought about how asymmetry draws your eye in and how that works really well for this little gal of mine and here is the story. When she was born, she appeared to be cross eyed, but as she grew the next couple of months they noticed that although she appeared to be cross eyed (especially in pictures) she didn't test for being cross eyed. Finally they measured from the middle of her nose to where her eye starts and it turns out they are not symmetrical. The flap of skin is just a little wider on one side when compared to the other. What does this mean? Nothing except she appears cross eyed in pictures and people are drawn to her big blue eyes. Turns out we humans like symmetry and when something is just a little off our human brains are then focused on that. Her big blue eyes will always get noticed because of that (not sure if that will be a good thing when she is a teenager:). And this little outfit, will hopefully catch your eye as well.
 The outfit consists of 5 things:
1. Gray skirt from men's button up shirt with red, separating zipper---makes it seem like a wrap around skirt in a way.
2. Simple, self drafted peasant top from red and white striped shirting (JoAnn's), with gray piping, off set buttons and off set pleat.
3. Blue knit leggings self drafted from another pair of her's
4. Knit hat from my own pattern with cool yarn that had sparkly sequins
5. Leg warmers from a sweater that didn't get used for last weeks look
There is definite mix and matching potential with a lot of things from her wardrobe.
 And here are a couple more pictures of this cute gal of mine as well as some close ups of the outfit. 
 She really wanted a picture where it looked like she was holding the suitcase like she was getting ready to leave. 
And there you have my signature look for Project Run and Play.


Tuesday, October 1, 2013

Sophia's Signature Look

Just wanted to share Sophia's signature look here as well. For the full pattern review head over to Sew Cool for the Tween Scene.

She wanted a tunic and leggings and I complied...I just like these pictures of her.
She is really turning into a beautiful young woman, both inside and out.


Monday, September 23, 2013

Mad for Plaid and Color Block Cardigan

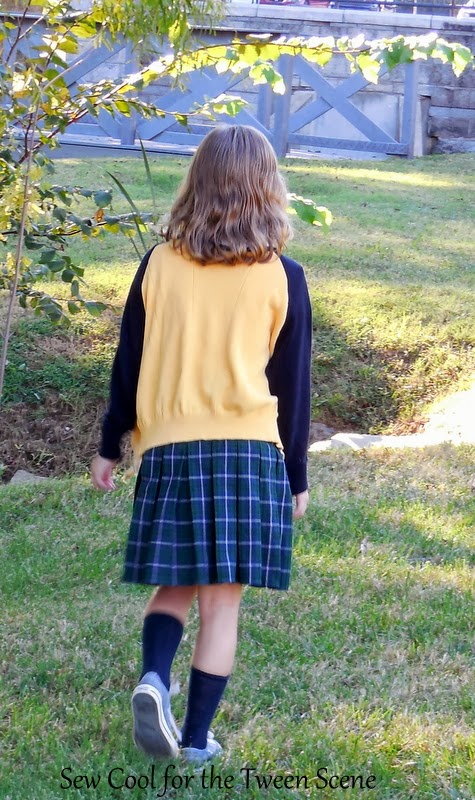
Hop on over to Sew Cool for the Tween Scene to see my how to on this skirt and color blocked cardigan.  You can also see how well you know me and my reason for loving plaid.


Thursday, September 19, 2013

Bubble Gum Ball Pullover

 The inspiration for this outfit...the dot fabric of course! It looks like colorful bubble gum balls, so we went with that. Don't ask my 5 year old though, she's still insisting this is her lolly pop outfit because I originally thought I'd do 2 lolly pop outfits. Even though we went with bubble gum with this one, I still promised a photo shoot with the big lolly pops. Just like many things in life though, plans had to be changed. A cross country meet went an hour over and there were no lolly pops to be found, so it was just some quick photos outside of our house 15 minutes before we had to leave for school.
So here is my second candy inspired outfit for Project Run and Play. You can see the first one here.
Bubble Gum Pullover
I used the Nature Walk Pullover pattern by Olive & S and it was a quick easy sew.  The pants were a remake from a women's shirt.
Here she is discovering the side pockets aren't really pockets but more of a pouch...she was startled to find that her hands touched in the middle.
 The shirt I used to make the pants (don't you love the bubble gum pink stripes?) was a V neck with a little row of buttons on some grey binding. I liked the grey accent so I kept it and just added a panel to finish off the pants.
 Here's a better look at the pullover. I thought it opened a little too far down so I added the bias tape tie and decorative buttons

 Close up of the details.
Linked up to Train to Crazy
 And finally, head over to see the "Flip" for the month of September at Frances Suzanne. I'm one of the competitors this month.

Wednesday, September 18, 2013

Some Things I've Been Up To

My husband got a cover for his Mac Book...lab issued computer, oh how I wish it were mine. Just some soft corduroy on the inside and soft wool on the outside closed with a button tab. Nothing too fancy or complicated. I really don't sew for him much so this was kind of fun. I really wanted to do the outside out of leather and even priced some leather jackets at Goodwill, but couldn't justify the $30.
 And those would be the dining room chairs that I am in the process of recovering. I'll have some before and after pictures of the whole process, but lets just say they were ugly. I waited and waited until I was able to use a 20% off on your total purchase coupon on home dec fabric that was 50% at JoAnn's. You see I wanted to use the Crypton fabric, which is kind of pricey (it also doesn't come in a huge selection of patterns or colors), but it should be worth it when it comes to durability. Do you know what the hardest part of the recovering process is? Taking out the rusty staples...and there are 2 sets of them. The chairs have 2 different fabrics on them and it seriously takes 2 hours to get all of them out.
And if you are interested, go check out the outfit that Sophia designed and I made for a tween look for the Project Run and Play Candy Inspired week.

Thursday, July 18, 2013

Whimsical Tunic with Side Ruching

Just something I'm bringing home.  It goes along with this post.

 Hello Project Run and Play readers!  It's Sally from Daisy Chain Creations, here to share a little detail that makes a tunic go from humdrum to whimsical...just add a little contrasting ruching (and an exposed yoke...but I'm not going to overwhelm you today).
While we are just wrapping up the school year here (2 more days!!!), I'm already thinking ahead to the next year and this little gal's wardrobe.  She'll be starting kindergarten and I want her to have some fun pieces that match her personality.  She pretty much lives in hand-me-downs, which is really nice, but not necessarily her...do you know what I mean?
That is how this tunic came to be.  She really liked the one I had made for her sister earlier this year, so I let her pick out the fabric for her first piece to go in her kindergarten wardrobe (hence the reason it's a little big...it is still 3 months away). We found the cute owl fabric at our local JoAnn's.
First, you want to start with a tunic like top.  You could use any top pattern and just extend it, but I just traced a pattern from a shirt that fit her on the large size (make sure you account for seam allowances).  You also want it to be a little longer, going below the waist so you can ruche it up.
Then you want to assemble the shirt and finish the bottom hem.

Now it's time to make the little placket and ties for ruching.  You could use ribbon if you didn't want to make the ties, just make sure you do something to the ends to keep them from fraying.
The placket pieces are 2 1/2 inches wide.  The length is up to you and how far you want it to go up the side of the shirt. For the ties you want them to be a couple of inches longer than your placket.  I made mine 1 inch wide.
Next you want to finish the bottom edge of the placket with a small hem. ( I skipped this step because the I had a nice printed selvaged edge, which I figured was just as good)
 Now you want to iron the sides and top in 1/2 and inch. 
If you are making the ties, fold them in half right sides together, sew and turn.  Then finish the edges.
 Here's what you end up with and now you are ready to assemble.
You also want to snip the ties in half.  You could potentially adjust this idea so that you use one continuous loop, but since I'm making it for kids I figured I wanted the top ends secure so I wouldn't have them getting pulled all the way through.
 Now you want to mark the middle of the placket lengthwise (I just marked the top and bottom, but you might want to mark a line down the entire length).
Pin it to the side seam, making sure to line up the middle of the placket with the seam. 
 Sew along your line in the ditch of the side seam, all the way from the bottom hem to the top of the placket. 
 Next you want to pin the ties right next to the seam, one on each side.  Let the ends stick out a little at the top.
 Now it's time to attach the rest of the placket.  First sew around the placket, up one side, across the top (I always back stitch and come back across to make sure the ties are nice and secure) and then down the other side.  First go around at 1/4 and inch.
 Now you want to snip the ends so that they are not sticking out.
 Still with me?  We're almost done.
Sew around the placket again, this time with an edge stitch.  I also added another row at the top to secure the ties  good and tight...we're talking about a 5 year after all, so who knows how much tugging she'll do with those ties.
 And there you have it...a cute ruched tunic.
Stop on over at Daisy Chain Creations to learn how to do the whimsical exposed yoke that you see on the tunic.
My first version of the tunic had the placket on the inside, which makes it a little less whimsical, but still fun to have some contrast going on.
Thanks for having me here on Project Run and Play!

Monday, May 20, 2013

Whimsical Tunic Embellishments

Today I'm sharing how to do the side ruching on this whimsical tunic over at Project Run and Play.  But I also wanted to share how I did the exposed yoke and sleeve tabs.
Like I said in my post over at PR&P, we're thinking ahead for some fun pieces to add to Clara's kindergarten wardrobe.  She really liked this fun owl print and the green polka dot went perfectly with it.  But why hide it on the inside?
 To create the yoke, use your back and front pieces to make a pattern.  Since I was creating the tunic without a pattern, I decided to have a little fun with the opening.  I decided to do the scallops to mimic the dots.  You can do something simple like I did for the first tunic I made.
Here you can see how I created the neck line on the front piece of the bodice. 
 Then I cut it out.
 For the yoke piece, I simply used the bodice pieces as the pattern. Done before you sew the shoulder seams of the bodice together.
 Next decide on the width of the yoke, making sure you match the front and the back pieces when it comes to how wide you'll be making it.

 Here's the 2 yoke pieces laid out on the corresponding bodice pieces.
For the next step you want to sew up the bodice pieces and then the yoke pieces at the shoulder seams, making sure to use the exact same seam allowance on both sets.
Now to attach the yoke to the bodice, you sew with the right side of the yoke to the wrong side of the bodice.  Very important, because you'll be flipping it out to the right side of the bodice.  After you've sewn them together, snip the seam allowance.  Since I had curves on this one, I notched it pretty good.
Once you've flipped the right side out, press and edge stitch around the neck opening only.
The next step is kind of tricky and takes a little patience.  You need to fold under and press the outside edge of the yoke.  Once you've pressed it, pin it really well.
Edge stitch around the outside edge and you are done with the yoke.  It's fun to have a little contrast!
Silly wide eyed girl.
View of the front and back yoke.
 As for the sleeve tabs, this is a pretty easy embellishment.
When you fold under the hem for the sleeves, just slide a tab into  the hem before you stitch it up.  Then fold it up and add the button.  Another simple thing to do to add a little contrast.
 One final picture of this silly girl.  She was making wide eyes this whole little photo shoot. 
Linked up here--Train to Crazy

LinkWithin

Related Posts Plugin for WordPress, Blogger...