

(If you grabbed a button before today, you'll need to grab a new one. I had the code wrong and had to fix it:)
We are going to start the whole thing off with some basic skills, for which you don't need a sewing machine. Those skills would be sewing on buttons and some simple hand stitching. Learning how to thread and hold a needle, as well as sewing on those wayward buttons are things everyone should know how to do.
So without further ado, this weeks project:
 Wall Art in a Hoop

Objectives:
1. Learn how to thread a needle.
2. Learn how to sew on a button--including different types.
3. Become familiar and comfortable with using a needle and making stitches.
4. Learn how to start off with a knot and how to anchor and tie off at the end of stitching.
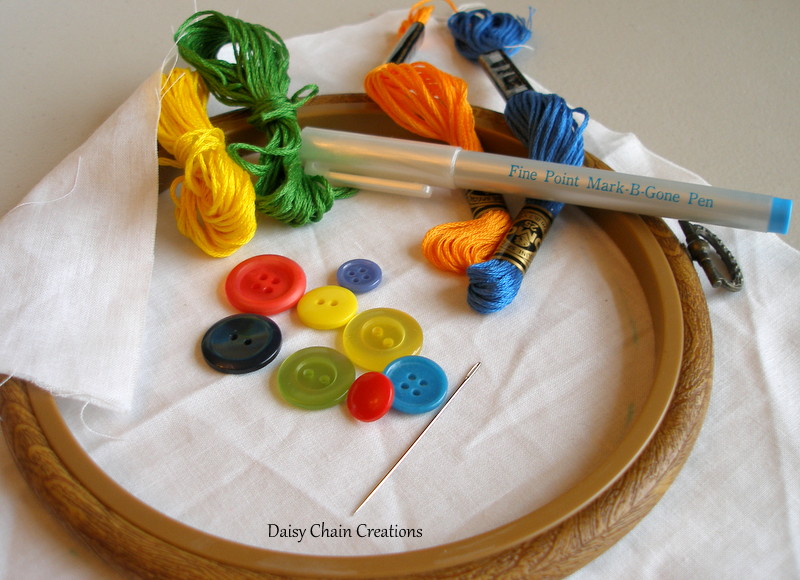
-Embroidery hoop of any size (but you want it big enough to make a picture)
-Piece of fabric big enough to fit into hoop. It can be any type, but a little stiff is better for beginners.
-Assortment of buttons--make sure to include 2 and 4 hole as well as some with a shank
-Marking pen or sharp pencil
-Needle
-DMC floss or embroidery thread
-Ribbon for finishing, if desired
Here's the how to:
First, before you even start make sure your participant is willing. Talk up how they get to design the 'art' and then go with it. Also, this doesn't have to be finished all in one sitting. They could get the design going and then work on it when they watch tv later on or something like that.
1. Make sure fabric is big enough to fit in hoop by placing it in and securing the hoop. Cut down to size, so that there isn't too much extra to get in the way of little hands. Take it back out of the hoop.

3. Have them come up with a design idea--but don't draw yet. This is just so you get an idea of what buttons to use and where they want to go with the design.
Some suggestions: --buttons as flowers--geometric circle design--turning the buttons into something like bugs, eyes, etc--the possibilities are endless.
4. Select which buttons to use. Again, make sure they pick a variety of types and enough to get some good practice at attaching buttons. I would suggest at least 6, but more never hurts either.


5. Draw on the design to incorporate the buttons. Make sure to mark where the buttons go.
***Keep it simple, especially if the hoop is on the large size--you don't want them to get frustrated and give up or lose interest***


9. Once they get to the end of their design/color they are using, teach them how to tie a knot and secure.
 10. Once the design is finished, sew on the buttons. Since you are using different types of buttons, you will have to make sure they understand the differences.

2 Holes--Come up in one hole and go down in the other about 10 times and then tie off.
4 Holes--I like the x method, so come up in one go down in the diagonal hole. Then do the opposite direction. Repeat 4 times.
Shank--Come up close to where the center of the button should be, go through shank and go down close to center, keeping stitches close to the middle.
11. Once all of the buttons are on, the design should be finished. Tighten up the finished product in the hoop, because it can slacken as you sew. Now cut off the extra fabric from around the hoop and run a little glue around the back rim to hold in place.
12. Once glue is dried, you could finish the hoop by painting it or running a ribbon around the edge, tying a bow and gluing to keep in place.
13. Proudly hang it on the wall, because you just made your own sewn wall art!
 |
| This is what my daughter has picked out for hers. I think she's going for the garden look. |
Ideas to make it a little more challenging for someone that's a little older or might have some experience:
--Add things like fabric embellishments
--Make design more complicated with more detail and using more colors
--Stitch things like letters
We hope you post your daughter's finished creation once completed!! Looks like a great color selection...
ReplyDeleteShe's working on it this week and I'll post a picture when she is finished. She's pretty excited about it.
ReplyDeletewhat a fun starter project!! I love the happy colors too.
ReplyDeleteI love this project. I don't have some of the skills required to teach this to my kids. Can you recommend any books, sites or you tube videos that can give some guidance on basic stitches?
ReplyDeleteAnd the pen you used to mark is is an air erasable pen or do you wash it?
I have all the supplies just not all the skills! I would love to get the kids started on something like this.