Showing posts with label home. Show all posts

Thursday, April 16, 2015

Not a Lot Going On Here

I would like to say I'm sewing up a storm...but I'm not.  I managed to get these curtains done before we had visitors come for Easter.  That's about all of the sewing I've done in the past little while. (Remember my post from a while back...? So I didn't go black and white, but did go geometric and simple)
The fabric is this navy blue wax resist dyed loveliness that my husband brought back for me from Ghana, way back in January. It's only taken 19 years for him to learn what I really want as a souvenir:)

I left the side edges raw (they even wax resist dyed the name and some other things on the side) and then simply used a rolled hem for the top and bottom.  I didn't want to waist any of the fabric by hemming too much.  As I was cutting it out to the measurements, last minute I remembered to make sure that the circles would line up from panel to panel...that was a close call.  I'm kind of loving how they look. Simple, yet stunning to look at. And they are simply hung with little clips on a simple rod.
As for what has been keeping me busy, besides chauffeuring my kids around, on the days it is nice outside...I love Spring...I've been outside discovering what our flowerbeds have to offer. Since we bought this house and moved in July 1st, what blooms in Spring is a nice surprise. Every day it seems like it is something new, awakening to the warm sunshine that has become more the norm.
So here are some of the surprised for your enjoyment.


 One night a couple of weeks ago, there was a chorus of probably 50-80 of these guys in our little pond...it was loud! The result is now a ton of tadpoles swimming around. The girls are having fun with daily observations...got to love backyard biology!
 And this lovely sight is from a drive on Easter around a local park. How many turtles can you count?

Friday, January 9, 2015

In Black and White

So it's been a while...with the holidays (can you say 3 different concerts?!), camera not working, sick kids, life...and...and...it's been a while. But I am going to be better...

I thought I'd share what is on my mind at the moment though...it's cold here and I still haven't put up window coverings of any kind. While we have fairly good windows, I wonder if having some sort of curtain up would help in the whole heating department.  Not sure if it would or not, but it sure would help in feeling that the rooms were "completed". 
That's what I have on my mind...curtains.
I've ventured into curtains before and plan to reuse those, but I need some new ideas as well.
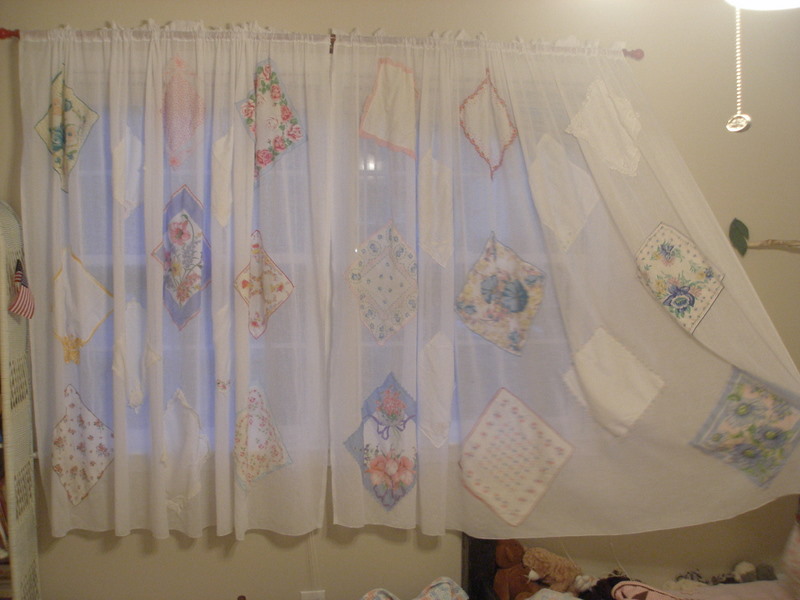
These I made from some vintage handkerchiefs...still love how they turned out!
I find that I'm still drawn to the simple white with black lined details, like this one from Ikea
SISSELA Fabric IKEA
Or this one from Ikea:
STOCKHOLM Fabric IKEA
And not only am I drawn to black and white, but to the more organic looking designs verses the actual patterns.  This is probably why I'm drawn to doodling like this: 
My Christmas present to myself, found on Amazon.
So my thinking is going down this road: I wonder if I could design/draw my own fabric. I have a bunch of white (same fabric used in the handkerchief curtains actually) and I'm thinking with a sharpie I could come up with something that is not only really cool, but really unique.
The question is, is it doable? 

Tuesday, February 25, 2014

Enticing Spring

Have you even had the feeling that you aren't really in control of your life, because there are so many external factors that are? Well that's how I feel right now...and when I start to feel that way, I start to find ways to 'change' things that I can control, like decorating. Plus this winter just seems to be dragging by...so when I was in JoAnn's the other day to pick up that ONE zipper and nothing else, I saw that home dec fabric was 50% off and I had a 15% off total purchase coupon. I found myself being drawn to these bright and sunny patterns/colors. I picked up $25 worth of fabric and made my living room "look like Spring", according to my daughter.
I just took the fabric that I had picked up (guessing really how much I would need when I bought it, but ended up with 1 yard each of the 2 florals and 1/2 a yard each of the yellow geometric and blue/green used for the pillow in the middle) and managed to get 7 slip covered pillows and one little curtain. The big pillow on the right is one I already had and it kind of matches.
 And now I have a reason to smile when I walk in my living room.
 I think I'm going to paint the walls a pale blue next. My dream would be to recover that ugly but with oh so great lines sofa (we inherited it when we bought our house) in a dove grey. 

Wednesday, September 18, 2013

Some Things I've Been Up To

My husband got a cover for his Mac Book...lab issued computer, oh how I wish it were mine. Just some soft corduroy on the inside and soft wool on the outside closed with a button tab. Nothing too fancy or complicated. I really don't sew for him much so this was kind of fun. I really wanted to do the outside out of leather and even priced some leather jackets at Goodwill, but couldn't justify the $30.
 And those would be the dining room chairs that I am in the process of recovering. I'll have some before and after pictures of the whole process, but lets just say they were ugly. I waited and waited until I was able to use a 20% off on your total purchase coupon on home dec fabric that was 50% at JoAnn's. You see I wanted to use the Crypton fabric, which is kind of pricey (it also doesn't come in a huge selection of patterns or colors), but it should be worth it when it comes to durability. Do you know what the hardest part of the recovering process is? Taking out the rusty staples...and there are 2 sets of them. The chairs have 2 different fabrics on them and it seriously takes 2 hours to get all of them out.
And if you are interested, go check out the outfit that Sophia designed and I made for a tween look for the Project Run and Play Candy Inspired week.

Tuesday, August 27, 2013

My New and Improved Sewing Closet

Time to bring this one home. This was one of the things on my to do list this summer.
~~~~~~~~~~~~~~~~~~~~~~~~~~~~~~~~~~~~~~~~~~~~~~~~~~~~~~~
Hi there GYCT readers! Sally here from Daisy Chain Creations, where I blog about my crafting endeavors.  I'm here today to share with you how I organized my sewing closet. 

In my dreams, I would have this amazing craft/sewing room (I could post pictures of the ones that make me sigh, but I won't). One where I could leave my sewing machine out, my projects on the cutting table, with a comfortable chair and a lovely painted room.  Since that is not coming true anytime soon (I'm talking when the 2 oldest are off to collage...which actually is closer than I'd like), I've decided to show you my closet "make over" and share a few tips on how I make a "portable" sewing room work.

Here's the before pictures of my closet, which I'll admit is probably at it's worst since we moved into the house 2 years ago.  With the end of school and summer travel, I just kind of piled in things.  The closet also doubles as the vacuum storage and work out equipment storage.  This is just our closet by the side door to our house.  The shelves were there when we bought the house.
Here's the nice spacious closet empty. It really is a nice sized closet...a lot better than the 3 drawer dresser I had when we lived in a 2 bedroom apartment...so I shouldn't complain.
Here is all of the stuff that was in the closet.  When it came to organizing, I tried to put all the like things together as I took them out.
I also made a note of what didn't work about how I had arranged things before.  Here's the short list:
-I was buying doubles and sometimes triples of thread colors because I couldn't easily see what I had.
-I couldn't see or get to my fabric easily.
-I had things I hardly used on the shelves at eye level.
-My little drawers were just full of stuff and not well organized.
-I needed a place to keep my ongoing projects where I could see them and keep them in mind...so I would finish them:)  Projects were currently stuffed into a basket.
And here is the after.

I put all of my fabric where I could easily see it and organized it by colors and or types of fabric.  The basket up in the left corner has all of the 'specialty' type fabrics that don't fold and stack easily.  In the top right corner is stuffed the bags of batting.  The little containers have been sorted and labeled.  I also organized and labeled the little drawers.  The bags on the bottom left are just those reusable shopping bags. One has my scraps that I'm cutting into squares for my quilting mother, another has the things that needed to be mended and another has the scraps that my kids can use for projects and fun.  I wanted to make them easy to grab and pull out, without making a mess or having to rummage.  If I'm watching a movie I can now just pull out the bag of mending or cut some squares.

This is probably the biggest change.  I wanted to use the door space some how, but couldn't nail or screw anything into it...so nothing too heavy, everything is hung up with the command strips.  Here's what I added: the thread holder for my most used threads, a magnetic board to keep track of my "commitments" and a cork board that will now hold reminders of what I need for upcoming projects...hopefully this means less trips to places like JoAnn's and Hobby Lobby.
 And one final look...it no longer doubles as the work out equipment storage, but I do have to fit the vacuum in here because there is no other place to put it.
 Like I said, I kind of look at my sewing room as portable. I sew in what would be the dining room of our house, but for us is the music room.  That little folding table is where I put my sewing machine when I set up shop.  I just like to be able to take it down when we have company coming.  Because sometimes this is a quick set up/take down time I have some things to help in the process. 
The biggest help is this basket.  As I grab my machine and table, this is right there ready to go as well.
I keep in here the things I need at my fingertips when sewing.  I also use it to keep the current project in the works contained if I have to take down shop.  Then when I set up again, it's all right there.
This is just what I consider my essentials.
 This is the other thing that I added that will hopefully help me be a little more focused and keep things from getting piled up in the closet.  You see a lot of the piles were actually projects that I had in the works...sometimes I like to multitask and work on a couple of things at a time.  It keeps things interesting.  
The original idea came from here.  This idea caught me eye because I was trying to think of a way to utilize the hanging space of the closet.  I just got some pants hangers, gallon zip lock bags and came up with this little print out that helps me to know what I have going on with each project. Each bag contains one project. As I gather the things for that project they go into the bag and then when I want to work on it, I can just grab it.
 Here's the print out.  I added what I did, because I sometimes need to know why I'm making something...sometimes it's not for me or it's at the request of someone else. Sometimes I have a timeline/deadline, so I included that as well. For the supplies, I divided it up so that I could take an inventory of what I already had and then needed.  Then I added the bottom a 'Things to buy' section that I cut off and pin to my board.  The 'Ended up Using' box and the comments box are more for blogging purposes.  It's nice to know what fabric I used and so on, so now I just jot it down. As for the comments, since I grab the bag and take it to my sewing machine, I can write things down as I go that I want to remember to write about in the blog post.
 
So there you have it.  Hope this helps you get your sewing space a little more organized!

Friday, August 16, 2013

Finding Use for a Sari

A couple of years ago, my husband had the chance to travel a lot for his job. One of the places he went a few times was India, to the region that is known for it's silk, so I asked him to bring me home some silk...that I could then make into something. Instead he brought home this beautiful, hand woven, silk sari.  While there are some great youtube tutorials on how to wear a sari and I figured that out...there just aren't that many places for me to wear it to. Not wanting a beautiful piece of fabric to just sit there and not wanting to cut it up, I decided to go this route. I used a small curtain rod attached to the ceiling and some curtain pull back things to hold it back. Once I paint the stand and bookshelf and get white bedding with maroon and orange accents of some sort, I think I'll have a complete look.
 I made the headboard myself too. I think I read about 25 different tutorials on how to make one, so I can't point you to just one. But it was pretty easy to make and always fun to use some power tools.  The silk at the end of our bed is from India too. It's hand embroidered and just amazing.

Thursday, August 1, 2013

I'm over at Get Your Crap Together to share my tips on organizing a sewing closet.

Get Your Crap Together

You'll see how I went from this:
To this: 
Plus I'll share a useful tip on how to keep those "to-do" projects at the forefront of...really your face.
Head on over to see what I came up with!

Monday, July 22, 2013

Treading Water

Summer time is not my most productive time.  I don't get a lot done with the kids home...that's just the way it is.  I feel like I'm treading water most of the time, barely staying afloat trying to make sure everything is getting done and it's not because we are that busy.  I guess that is just how life is sometimes. 
Anyway...here are 2 things that I have been busy with:
Our garden, which is really 2 10ft x 5ft planter boxes, has been really productive lately. This is the harvest from just one day last week.  We've been eating a lot of tomato and cucumber chopped salad. I even tried my hand at canning pickles.  
 And this:
My mom got this serger for free and since she already had one, she asked me if I wanted one. I of course took it and have since been trying it out.  It's a little different mindset, sewing with a serger, don't you think?  The project on board there is actually something for me {gasp!}

Wednesday, March 20, 2013

Outdoor Creations

 It's that time of year when my creating starts to take place outdoors.  Well I actually can't take credit for the creating part...I just tend the creations.
This year we are expanding and adding to our garden.  I also started things indoors for the first time.  Usually, I just plant and hope for the best.  I also managed to get all of the early crops in on time this year.  My husband was happy, because his favorites are the peas and you have to get them in rather early here in the South.  Who knew you had to think about planting in February and actually get it done at the beginning of March?
 Growing up we always had a garden...a HUGE garden on an acre.  Then we lived off of what we grew and then subsequently canned.  While I don't have plans that are quite that big, it is nice to feel a little self sufficient and capable.
So while I'll be sewing a little bit over the next couple of months, I'll also be tending these outdoor creations.

Wednesday, March 13, 2013

A Little Wall Art

  A month or two ago we swapped the boy's and the girl's rooms and each got a fresh coat of paint.  We moved into our little ranch almost 2 years ago and haven't done much to it.  It was still painted the same beige all throughout the house (except the kitchen, which I'm going to tackle next).  Each of the bedrooms is now a different color.  The girl's is a lovely Spring green (not minty pastel) and I've been trying to decorate it.  This is the newest addition, the quote on the wall. (The flower picture is from here and the embroidery pattern from here--embroidered by me and changed every month)
The quote is from Anne of Avonlea and is one of my favorite literary quotes of all times.  It's from a conversation between Anne and Gilbert before they start their first year as teachers.  Gilbert just decided that he was going to be a doctor and change the world that way.  This is Anne's response (I did change the word 'them' to 'people' to make it make more sense):
I just simply wrote the quote out with pencil and then painted over it with acrylic paint.  The little shadow is actually a tracing of a paper cut pattern from a blog that I found, Sherenschnitte, and then I changed it up a bit by having her blow a dandelion puff instead of bubbles.
Once I get their comforter covers done, I'll do a little walk through of their room. There's a lot of homemade goodness in their room.

Friday, November 5, 2010

The Curtains

The curtains for the girl's room are finally finished. I used the lovely handkerchiefs that I inherited and had fun picking out which ones to use.

LinkWithin

Related Posts Plugin for WordPress, Blogger...