Showing posts with label fabric. Show all posts

Thursday, April 16, 2015

Not a Lot Going On Here

I would like to say I'm sewing up a storm...but I'm not.  I managed to get these curtains done before we had visitors come for Easter.  That's about all of the sewing I've done in the past little while. (Remember my post from a while back...? So I didn't go black and white, but did go geometric and simple)
The fabric is this navy blue wax resist dyed loveliness that my husband brought back for me from Ghana, way back in January. It's only taken 19 years for him to learn what I really want as a souvenir:)

I left the side edges raw (they even wax resist dyed the name and some other things on the side) and then simply used a rolled hem for the top and bottom.  I didn't want to waist any of the fabric by hemming too much.  As I was cutting it out to the measurements, last minute I remembered to make sure that the circles would line up from panel to panel...that was a close call.  I'm kind of loving how they look. Simple, yet stunning to look at. And they are simply hung with little clips on a simple rod.
As for what has been keeping me busy, besides chauffeuring my kids around, on the days it is nice outside...I love Spring...I've been outside discovering what our flowerbeds have to offer. Since we bought this house and moved in July 1st, what blooms in Spring is a nice surprise. Every day it seems like it is something new, awakening to the warm sunshine that has become more the norm.
So here are some of the surprised for your enjoyment.


 One night a couple of weeks ago, there was a chorus of probably 50-80 of these guys in our little pond...it was loud! The result is now a ton of tadpoles swimming around. The girls are having fun with daily observations...got to love backyard biology!
 And this lovely sight is from a drive on Easter around a local park. How many turtles can you count?

Monday, November 10, 2014

Betty Skirt Tour

So a couple of weeks ago I learned I was the lucky winner of one of the Abilmente Prize packages given by Annika over at Naeh-connection (seriously, I felt like it was Christmas morning) and part of the package was this lovely bundle of Cotton and Steel "At the Zoo" from The Fat Quarter Shop.
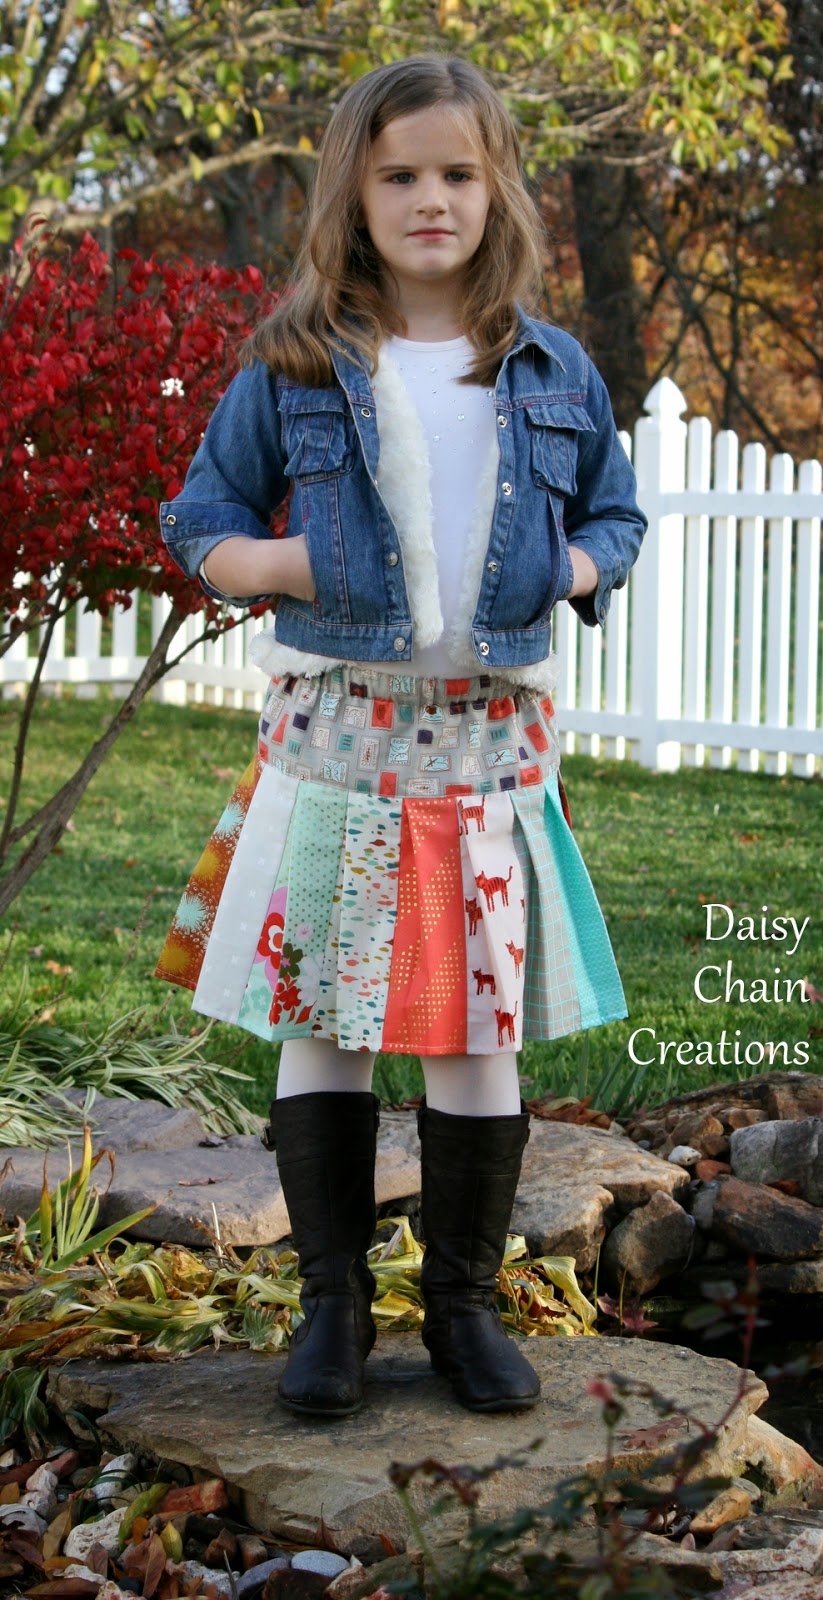
I decided that the fat quarter bundle would be perfect to make this pieced Betty Skirt, since I get to be part of the Betty Skirt Tour.
The lovely ladies over at the Shaffer Sisters have put out this great basic skirt pattern that has tons of options. The Betty Skirt makes a great go-to skirt because it's simple to make, but the pattern allows you to personalize it to suit your needs.
I chose to do the large pleated option, but decided to make each pleat a different fabric from the bundle. This worked out perfectly because the longer width of the fabric was exactly twice what I needed, therefore the front and back pleats are exactly the same.
To get the pleats, I took the measurement of the pleat guide between pleats and added a seam allowance of 1/2 an inch, cutting the strips to the length I needed. Then I sewed them all together, pleated it (using the seams as a guide...no marking needed) and added it to the yoke.
This silly girl loves how it turned out. Even my 11 year old likes (and since they kind of wear the same size...I think she has her eye on it). The fabric was lovely to work with and such a visual treat!
As for the Betty skirt...you just need fabric and elastic (you do need buttons for the one with the placket) and that is it! It comes together fast, comes in a huge range of sizes, and has well written instructions.
Another plus...it's got great twirling factor...that means a lot in this household.
So if I've piqued your interest, you should go and check out the other stops on the tour...there's been some beautiful creations, and then go and buy it yourself with the discount code!
Displaying betty-skirt-tour.jpg

Now for a slightly random change of subject...this is my normal camera lens (it is just the kit lens...nothing special). It wasn't working so thanks to the invention of YouTube I thought I'd try to fix it myself. It was going to cost more than a new one (and the cost of the camera itself, since I bought it used) to get it fixed, so I thought I'd give it a go. I figured out the problem, ordered the part and all that is left is for the part to arrive and me to hopefully assemble it back together perfectly:)  I've been using my distance lens for my pictures the last little while...there's been a learning curve, but I do like how some of them are turning out.

Friday, August 16, 2013

Finding Use for a Sari

A couple of years ago, my husband had the chance to travel a lot for his job. One of the places he went a few times was India, to the region that is known for it's silk, so I asked him to bring me home some silk...that I could then make into something. Instead he brought home this beautiful, hand woven, silk sari.  While there are some great youtube tutorials on how to wear a sari and I figured that out...there just aren't that many places for me to wear it to. Not wanting a beautiful piece of fabric to just sit there and not wanting to cut it up, I decided to go this route. I used a small curtain rod attached to the ceiling and some curtain pull back things to hold it back. Once I paint the stand and bookshelf and get white bedding with maroon and orange accents of some sort, I think I'll have a complete look.
 I made the headboard myself too. I think I read about 25 different tutorials on how to make one, so I can't point you to just one. But it was pretty easy to make and always fun to use some power tools.  The silk at the end of our bed is from India too. It's hand embroidered and just amazing.

Sunday, March 31, 2013

Mini Chevrons

 So this week over at Project Run and Play it's chevron week.  I wasn't planning on sewing along because 1) I have a million other things going on and was not planning on sewing along this season and 2) I'm not really a chevron kind of gal so this week I wasn't even feeling inspired in my thoughts of "If I were to sew something what would it be?"
Until...
I was in the middle of this dress that I was making for a baby present to one of my amazing friends, mother of now 5 kids.
As I was sewing up the bodice, I thought to myself that it looked kind of like mini chevrons.  Not sure if that counts or not...but I'm going with it.  The pink mini chevron was leftover from my sew along with last season of PR&P, where I picked a color scheme and everything was matching/interchangeable. I never ended up using it for anything, but the teal leaf print did show up last season.
I used Butterick pattern # 3782...one I used a ton when my girls were little (you can see it on my youngest in my header...boy do they grow up fast!)
I did modify it a bit by lining it and having a button closure instead of a zipper.  I also gave it an underskirt because the white muslin was a little see through.
I also added the teal sash to the pattern, sewing it on as part of the bodice for the front and just having it tie in the back.  The leaf fabric is printed so that the leaves all go in one direction (see bottom picture), but I wanted it symmetrical  I cut it out so that I would have 2 pieces going opposites and sewed those together.  The little tab covers the seam, but I do like the visual aspect it gives to the dress as well.
Some of you might say "White, with a baby!  Are you crazy?", but really white muslin is easy to clean and as long as you put something on the spot it comes out.  I love the crispness of this color combination, especially against the white.  On the bottom of the underskirt I added white rickrack, which kind of mimics the lines of a chevron print.
 And here's a full view of the back. 
 So what do you think...chevron or not?
Linking up to The Train To Crazy and Girl.Inspired.

Wednesday, January 30, 2013

Project Run & Play--Week 4 "Love is in the Air"

Presenting 'Love is in the Air', my creation, well actually, Sophia and my's creation for Project Run and Play Week 4.
Sophia has a sock hop coming up at school, so we created this circle skirt (thanks to Dana Made), that has a Valentine feel, but will work great for the sock hop as well.
First we started by dying a bunch of white fabrics. It was kind of an experiment to see what would take the dye the best.  Interesting that the broadcloth (bottom middle) and the striped fabric cut from a pink shirt that was bought with next weeks challenge in mind, but not going to use, took the dye the worst.  I liked how the polka dot fabric (from week 2's outfit) took it the most vibrant along with the doilies.
Here's the layout of the hearts.  I then backed each with Wonder Under and ironed them on to a simple white muslin circle skirt.  From there the idea was that Sophia would practice some sewing and do the zigzag around.  I underestimated the willingness of a 9 year old, so I ended up doing most of it.  I then used my rolled hem foot for the hem of the skirt.  I also added a contrasting tab in the same aqua fabric from week 2 to cover where the elastic comes together (forgot to get a picture of that).  Then I added the doily and extra little heart.  We also added a doily and heart to a simple grey t-shirt as well to complete the look.
It is going to be a great skirt for the sock hop.  She had fun twirling in it.  The little underskirt thing was something I had made for another sock hop she went to a couple years back.  It's just a gathered white skirt with a couple rows of gathered tulle.

 I had wanted to go to the red caboose in our neighborhood for this photo shoot, but it was raining once again when I wanted to take pictures!  I'm getting tired of it!
 Just a fun view of the complete circle with the different hearts. 

Tuesday, October 23, 2012

Project Run And Play Recap

I think I stuck pretty much to the original design.  I added the hat, last minute, which was a fun addition.  I didn't use bias strips for the sleeves or add the ruffles on to the bottom, because I didn't have enough.
Things used from stash: turquoise and purple fabric from my mom many years ago and soft brown wool from her as well
Only thing purchased for this look: 2 yards white muslin and the 'D' rings for the belt.  Total cost: Under $5.00

This is the one I think I stuck closest to the original design.  Plus I added a look for Clara.
This is probably the one that has been worn the most too.
Things used from stash: red and white polka dot fabric and striped seersucker from my mom, button's on coat from my collection
Things purchased for this outfit:  striped shirt from Goodwill (turned into cardigan), white bottom weight fabric from Joann's, gold buttons from Joann's  polka dot and striped fabric for headbands
Total cost: $12


This was by far the hardest and most frustrating week. But it turned out close to what we had come up with and she likes it.
From stash: batting for the jacket lining, Jacquard fabric dye
Things purchased: white sheet from Goodwill, yellow buttons and zipper from Joann's and a daisy stamp from Joann's for the stamping
Total cost: $10

This one was a lot of fun, because I never sew for my boys.  He's even worn it a few times.
From stash: white bottom weight (from week 2), buttons, duck cloth (for number in back) and patch
Things purchased: knit shirt from Goodwill
Total cost: $1


The only week I planned on doing 2 outfits.  Again, I think I stayed close to the designs, but love the changes I made.  I really love Clara's shirt and Sophia's skirt.
Things from stash: shirt used for Clara's shirt, embroidered fabric purchased a while ago on clearance
Things purchased: maroon fabric, buttons on Clara's shirt, and zipper(x2 if you count the metallic zipper I tried out but didn't like) for Sophia's skirt from Joann's
Total cost for both: $8 


Check out both posts here and here. This is another week I decided to add a look for Clara last minute.  These were another set of outfits that I had a lot of fun making.  I dropped the tweed riding coat because Sophia said she wouldn't really wear it.  I didn't really want to spend a lot of time making it after she said that.  Instead I added a little sweater vest.
Things from stash: sweater I cut up for the vest for Sophia's look and 2 shirts for Clara's look
Things purchased: yarn for scarf, horse buttons, yellow fabric for scarf, yellow accent fabric and buttons for shirt from Joann's, fabric for Sophia's shirt on clearance from a fabric shop in Gettysburg, PA, men's corduroy pants from Goodwill used to make Sophia's pants and a scrap for Clara's belt
Total cost for both looks: $15


That's 9 outfits for just over $50!!!  I think that is pretty good and I stuck to my budget for playing along.  The key was using what I had, finding stuff at Goodwill and using the coupons for Joann's. (Oh and I like to raid my mom's stash when I visit, so that helps too:)
Also, I think re-purposing something makes a huge difference in cost (for example the men's corduroy pants only cost me $3, but to buy enough fabric for pants was going to cost me $12 and it wasn't even what I wanted).  The only week I didn't take some article of clothing (or sheet) and turn it in to something else, was week one.

Friday, October 19, 2012

Rundown on the Signature Look

So this is kind of the rundown post with more details of how I made each outfit.  If you just want the cute pictures of the girls wearing them and a quick synopsis of what I made, you might just want to check out the previous post:)
First up, the shirt.  This is the only piece that is made from completely new materials.  I had a lot of fun making this one and throwing in the extra details!  I just love how it turned out and would love one in my size.
I found the soft cotton with subtle green floral print at a specialty shop in Gettysburg, PA called Needle and Thread (they specialize in Civil War era fabric reproductions).  The yellow, buttons, and green ribbon came from JoAnne's.
I studied button up shirts for a while to figure out how they are put together and then measured Sophia and drew up a pattern.  The past couple weeks I've been practicing my placket making skills.  I can now say that I don't find the process at all scary now.
The collar turned out perfect with the contrasting yellow piping.  I also used the contrasting fabric for the inside of the collar stand (finally learned what that is called thanks to Stacy) and added the ribbon as well.  Little details make it fun:)
Again I used the contrasting yellow for the inside of the cuffs.
The back has a lined yolk, double stitching and piping detail.
The scarf is some gauzy, yellow fabric I found at JoAnne's.  I just did a rolled hem on each side (first time using a rolled hem foot...loved it!).  Then I stitched across about 2 inches from the end and frayed it.
The sweater vest is simply cut from an old sweater of mine that was starting to fit kind of funky.  I simply cut off the sleeves and extra on the side and the bottom and sewed it all back together.
Between the shirt and the pants, I learned a lot this week.  These pants are made from men's pants.  I wanted soft brown corduroy, that didn't have too big of a rib.  I couldn't find any fabric that I liked so I headed to Goodwill.  A size 38 men's pants was more than enough to get a size 8 girl's pants out of it.  I started by pretty much picking apart the pants, to see how they were put together.
When cutting them out, I used some pants of Sophia's as a guide to get the length and width right.  I used the existing inseam, but cut out the fronts and backs separately.  Then I used the leftovers at the bottoms to get the front pocket parts and zipper pieces.  I used the waistband (which I hadn't unpicked all of the way), tabs and little inner pocket from the original pants.  For the waistband, I started with the side with the button hole and pieced it around the top of my pants.  Then I cut off the extra and finished it off.  The pants have an actual zipper fly, my first, which was a lot easier than I thought they would be.  I love how they fit her and she says they are comfortable.
Now for Miss Clara's last minute outfit.  I started out with some leggings.  I thought I would do a skirt out of some brown tweed, but you see she has tons of skirts already.  The leggings will be something she can wear under all of those skirts.  They are made from the sleeves of a T-shirt of mine that seemed to be shrinking and getting too short.  I cut the sleeves off right at the shoulder seams.  Then I cut out the middle part that kind of looks like a diaper.  I cut it using the bottom hem of the shirt, so to make the casing to run the elastic through all I had to do was fold it over once.  I created the middle part first by sewing the crotch seam and two little side seams and then added the legs, just like you would sleeves.  On the bottom, I ruched them a little by stretching some elastic out and sewing in place.  Finally, I added some little horse buttons that Clara had picked out.  Not my choice, but they made her happy to wear the outfit.  You pick your battles:)

The tunic is a button up shirt of mine, that I never wore that much.  You see, while it is my favorite shade of green, I don't look good in that shade of green.  I look kind of sickly. Clara on the other hand looks good in it.  I picked off the collar and the cuffs.  Then I cut off the sleeves where I wanted them.  Thinking back, I think I should have cut off the entire sleeve and sewed it back on at the length I wanted.  Oh well.
The scarf is knit from some variegated sock yarn I found at JoAnne's.  The belt is made from some left over corduroy from Sophia's pants.  I just folded it over and sewed it together, finished off one end and added the D rings on the other.
To finish neck, I took some fabric left over from Sophia's shirt to make a casing.  Then I threaded some elastic through and put ribbons on each end, making sure to secure the elastic just inside the casing.
To make it fit better, I secured some elastic at the yolk seams on the shoulders and back.  It gives it king of a gathered look and less like a tent.
Another look at the sleeves.  The cuff was a little bigger than I wanted, but to save myself some time, I sewed it on inside out and folded over the extra so the buttons were on the outside.  Really I was just being a little lazy, because this outfit was an after thought:)

LinkWithin

Related Posts Plugin for WordPress, Blogger...